How to Conduct an AI Audit in 8 Steps
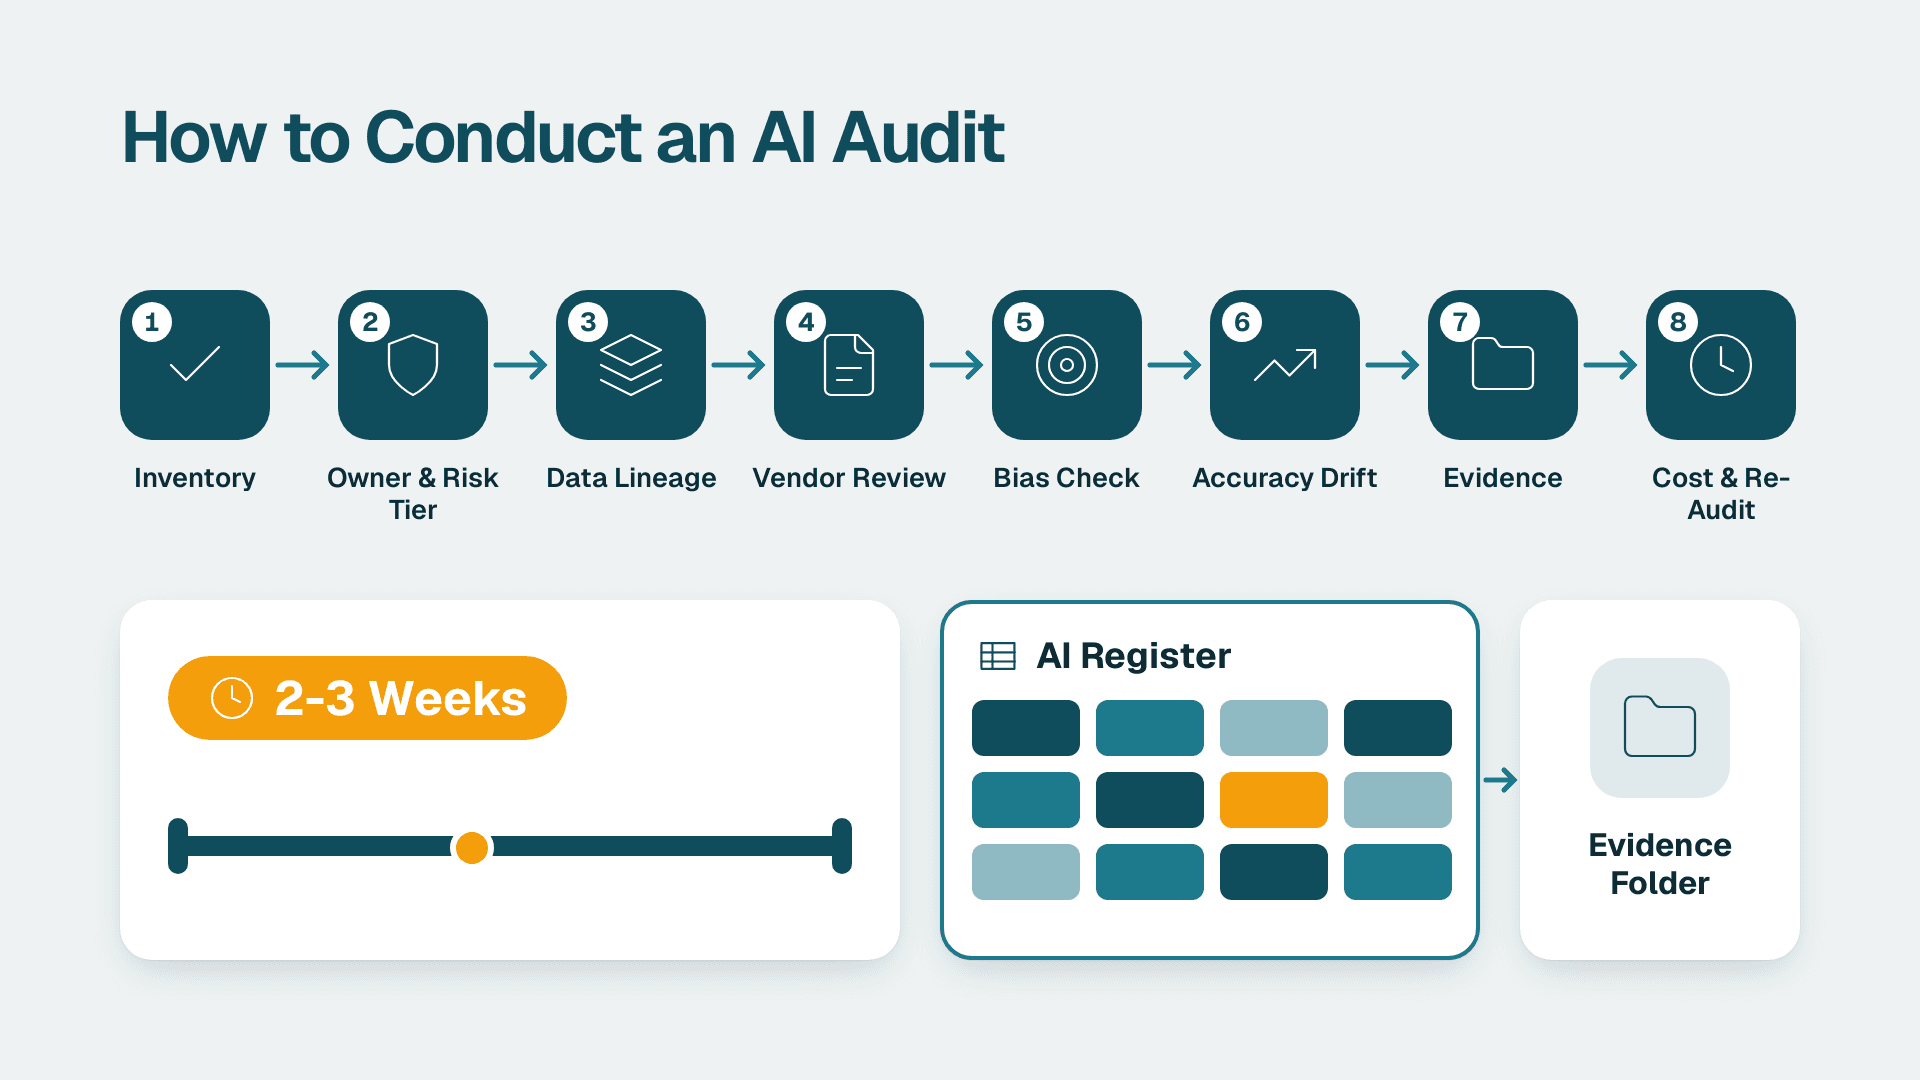
You can run a credible internal AI audit in eight steps: inventory every AI tool, trace its data, benchmark it for bias, measure accuracy drift, and write down what you found. Realistically it takes two to three weeks of part-time effort for a 20-200 person company, roughly 25 to 40 hours of your own time plus short interviews with tool owners. The output is one register, one evidence folder, and a short remediation list.
What You'll Need
Gather these before Step 1, or you will stall halfway through.
- A spreadsheet (Excel or Google Sheets) to act as your AI register. Create a new workbook with the tabs Inventory, Data Lineage, Vendor Review, Bias Tests, Accuracy Log, and Findings.
- Admin access to your SaaS admin consoles: Microsoft 365 admin center, Google Workspace Admin console, your ERP, CRM, helpdesk, and ecommerce platform.
- Finance access to the last 12 months of credit card statements and accounts payable ledger, to catch tools bought outside IT.
- A named executive sponsor (COO or founder) who can sign off on risk decisions.
- Two to four tool owners who can answer questions about how each tool is actually used day to day.
- If you use Microsoft 365: a role that can open the Microsoft Purview portal. Purview Audit (Standard) keeps audit logs for 180 days (Microsoft documentation, 2025), so pull evidence inside that window.
- A sample of real outputs from each AI tool: at least 30 recent items (quotes, forecasts, classifications, drafted emails, or report summaries).
If you want a view of the whole landscape before you start, read What Is an AI Audit? Four Types Every Business Should Know to pick which audit type fits your situation.
Step 1: Build the AI Inventory
You cannot audit what you have not listed. Most small firms undercount their AI tools because AI features arrive inside software they already own.
1. Open the Inventory tab and create these columns: Tool, Vendor, Business owner, Department, Use case, Users (count), Data types touched, Paid or free, Date adopted.
2. In the Microsoft 365 admin center, go to Billing > Your products and note any AI add-ons. In Google Workspace, open Billing > Subscriptions. List every line item with AI in its description.
3. Go through 12 months of card statements and the AP ledger. Search for terms such as "AI", "GPT", "assistant", "copilot", "auto", and "smart". Add each match.
4. Check browser extensions and free accounts. Ask each department head one question: "What do you paste into a chat tool or an AI feature to get work done faster?" Add the answers, marked Paid or free: Free.
5. Check embedded features: ERP demand forecasting, warehouse slotting suggestions, CRM lead scoring, helpdesk auto-replies, and ecommerce product-description generators.
What you should see: a list of 8 to 25 rows for a typical firm. If you have fewer than five, you have probably missed embedded features and free tools. Keep digging before moving on.
Step 2: Assign an Owner and a Risk Tier
Every row needs one accountable person and a tier that decides how deep the audit goes.
1. Add the columns Accountable owner, Decision impact, and Risk tier.
2. Score Decision impact with this rule: High if the output changes a price, a payment, a customer commitment, a hire, or a shipment; Medium if it informs a human decision; Low if it only drafts or summarizes with review.
3. Set Risk tier to Tier 1 (High impact or touches customer or employee personal data), Tier 2 (Medium), or Tier 3 (Low and no sensitive data).
4. Get the executive sponsor to confirm the tiers in a 30-minute meeting.
What you should see: most firms land with two to five Tier 1 tools. Steps 3 to 7 apply in full to Tier 1, in short form to Tier 2, and Tier 3 gets only a vendor check in Step 4.
Step 3: Trace Data Lineage for Each Tier 1 Tool
Data lineage means knowing where the data came from, where it goes, and who can change it. Most AI errors in small firms trace back to a messy source, not a bad model.
1. Open the Data Lineage tab with columns: Tool, Source system, Source table or file, Refresh method, Transformations, Destination, Retention, Third parties receiving data.
2. For each Tier 1 tool, ask the owner to show you the connection screen. In a BI tool this is the data source or gateway settings; in a SaaS tool it is usually Settings > Integrations. Screenshot it and save it to your evidence folder.
3. Record every manual step. A spreadsheet that someone emails weekly is a lineage link and a risk.
4. Check the vendor's data-use terms: does the vendor train models on your data, and can you opt out? Record the clause and the date you read it. If the answer is unclear, mark it Unknown, not No.
5. If your reporting runs on Power BI, record the refresh schedule and who owns each dataset. The guide to setting up a Power BI data refresh schedule without breaking reports shows what a clean schedule looks like.
What you should see: a one-line chain per tool, such as "ERP order table > nightly export > forecasting tool > planner's weekly buy list." Any link marked Unknown goes straight to the Findings tab.
Step 4: Complete an AI Vendor Due Diligence Review
This is where an AI vendor due diligence checklist for small business earns its keep. Run the short version on every tool and the full version on Tier 1.
1. Open the Vendor Review tab with columns: Vendor, Data location, Training on your data, Sub-processors listed, Security attestation available, Export and deletion terms, Incident notification terms, Contract renewal date.
2. Pull each answer from the vendor's trust or security page and contract, not from a sales call. Note the document name and date.
3. Request the security attestation report from each Tier 1 vendor in writing. Record whether it arrived and its reporting period.
4. Check licence conditions for features you assume you have. For example, Copilot in Power BI and Fabric needs a paid Fabric capacity F2 or higher, or Power BI Premium P1 or higher. A Pro or PPU licence alone is not enough, and trial capacities are excluded (Microsoft documentation, 2026). If someone on your team says Copilot is "on" but you hold only Pro seats, the audit has found a gap between belief and reality. The Power BI Copilot readiness checklist covers the rest of those conditions.
5. For a deeper vendor questionnaire, use the AI vendor due diligence checklist for small business.
What you should see: a grid with some blank or red cells. Blanks are findings. Do not fill them from assumption.
Step 5: Benchmark for Bias
Bias in a low-compliance business rarely means a lawsuit-grade hiring model. It means a model that systematically treats groups of customers, suppliers, or SKUs worse: credit holds that hit smaller accounts, lead scoring that ignores certain regions, or demand forecasts that under-stock slow movers.
1. Pick one decision per Tier 1 tool and name the groups that matter, for example customer size band, region, new vs existing account, or supplier country.
2. Open the Bias Tests tab with columns: Tool, Decision, Group, Items in sample, Favourable outcomes, Favourable rate, Gap vs best group.
3. Export at least 30 recent decisions per group (more is better). Use a pivot table: Insert > PivotTable, put the group in Rows, and the outcome in Values as Count, plus a second count filtered to the favourable result.
4. Compute Favourable rate as favourable outcomes divided by items. Then Gap vs best group as the best group's rate minus this group's rate.
5. Set a threshold with your sponsor before looking at results. A common internal rule is to investigate any gap where the lowest group's rate is less than four-fifths of the highest group's rate. Write the threshold in the tab header.
6. For each flagged gap, check whether a legitimate business reason explains it (for example, credit holds for accounts with overdue invoices). Record the explanation or log a finding.
What you should see: a table where every group has a rate and a gap. Small samples will be noisy, so label any group under 30 items as Indicative only.
Step 6: Baseline Accuracy and Set Up Drift Detection
Accuracy drift is when a tool that worked at launch slowly gets worse because your data, products, or customers changed. You catch it by comparing outputs with known truth on a schedule.
1. Open the Accuracy Log tab with columns: Tool, Metric, Test date, Sample size, AI output, Verified truth, Error rate, Threshold, Pass or fail.
2. Choose one metric per tool that the business already understands: forecast error against actual shipped units, percentage of invoices coded correctly, percentage of support tickets routed correctly, or percentage of report summaries with a wrong number.
3. Pull 30 recent items. Have a person who did the work manually check each against the source. Record the Error rate as wrong items divided by sample size.
4. This first result is your baseline. Set the Threshold at the baseline plus a tolerance your sponsor accepts, such as plus five percentage points.
5. Schedule the same test monthly for Tier 1 tools and quarterly for Tier 2. Put a recurring calendar event with the owner's name and a link to the log.
6. Keep a record of model or setting changes. The AI change log for Power BI reports shows a workable format for noting what changed, when, and who approved it.
7. For AI-generated reports specifically, the 10 AI-generated reports audit questions give you a ready checklist for spot checks.
What you should see: a baseline row for every Tier 1 tool and a calendar entry for the next test. If an item cannot be verified because nobody knows the right answer, that is a finding about the process, not the AI.
Step 7: Document Compliance and Evidence
For US firms in low-compliance sectors, there is usually no AI-specific regulator knocking. The documentation still matters because customers, lenders, insurers, and acquirers increasingly ask for it, and state privacy and consumer protection laws still apply to personal data. If you handle data on EU residents, map your register to GDPR duties as well, mainly lawful basis, data minimization, and retention.
1. Create an Evidence folder with one subfolder per tool. Move in the screenshots from Step 3, vendor documents from Step 4, and test files from Steps 5 and 6.
2. Add a Compliance Map tab with columns: Tool, Personal data processed, Purpose, Lawful or contractual basis, Retention period, Deletion process, Human review point, Evidence link.
3. If you use Microsoft 365, open the Microsoft Purview portal, go to Audit, run a search for the date range you need, and export results to CSV. Save the export in the tool's subfolder. Remember the 180-day retention for Purview Audit (Standard), so schedule this export before older records expire.
4. Write a one-page AI use policy covering approved tools, what data may never be pasted into public tools, and who approves new tools. Have the sponsor sign and date it.
5. Record each Human review point: the place where a person checks the AI output before it affects a customer or payment.
What you should see: every Tier 1 row in the Compliance Map has an evidence link that opens a real file. A row with no link is not documented, whatever people remember.
Step 8: Cost the Findings, Prioritize, and Schedule the Re-Audit
The last step turns the register into decisions.
1. Open the Findings tab with columns: ID, Tool, Finding, Severity, Fix, Owner, Due date, Estimated effort.
2. Rate Severity as Critical (customer or payment harm, or sensitive data exposure), Major, or Minor. Fix Criticals within 30 days.
3. Sanity-check your AI spend using the 70/20/10 rule for AI investment, a widely used planning heuristic: roughly 70 percent of effort on people and process change, 20 percent on technology and data, and 10 percent on the algorithms and tools themselves. It is a guide, not a law. If your spend is almost all licences, your findings will likely show weak review points and unclear ownership.
4. Estimate the cost of the audit itself honestly. An internal audit costs staff time, mainly yours and the owners'. External help varies with scope and tool count, so ask for a fixed scope and price in writing rather than an hourly estimate. If you are comparing options, an AI readiness assessment for small business run by a third party can cover Steps 1 to 4 faster than doing it yourself.
5. For tooling, you rarely need specialist software at this size. A spreadsheet, your admin consoles, and your logging in Microsoft Purview or your platform's equivalent are enough for a first pass. Dedicated governance platforms make sense once you have dozens of AI tools. Treat any "best AI audit tools for small business 2026" list sceptically until you have finished a manual pass and know what you actually need.
6. Present a one-page summary to the sponsor: number of tools, number by tier, top five findings, and the dates of the next tests.
7. Book the next full audit for 12 months out and a lightweight review at six months, or sooner after any major tool, model, or process change.
What you should see: a ranked findings list with owners and dates, and two future audit dates already on the calendar.
Common Mistakes
- Auditing only the tools IT bought. Fix: use the card statements, AP ledger, and the department-head question in Step 1 to surface free and embedded AI.
- Setting the bias threshold after seeing the results. Fix: write the threshold in the tab header before exporting data, so you cannot move the goalposts.
- Testing accuracy on the AI's own examples. Fix: pull a random sample of recent real items and have a person verify them against source records.
- Treating a blank vendor answer as "no problem". Fix: mark it Unknown and log a finding with a due date.
- Leaving evidence in people's heads. Fix: nothing counts until a file with a date sits in the tool's evidence subfolder.
Troubleshooting
- Symptom: your accuracy baseline is far worse than the owner expected. Likely cause: the owner has only seen successes. Re-sample randomly, not from items people flagged, and check whether a data source changed since launch.
- Symptom: the Purview audit search returns nothing for older dates. Likely cause: the records are past the 180-day Audit (Standard) retention window, so capture evidence earlier next time and export on a schedule.
- Symptom: bias gaps appear in every group comparison. Likely cause: groups are too small, or a confounding factor such as account age is driving the difference. Combine bands, enlarge the sample, and split by the confounder before drawing conclusions.
If you would rather hand the first pass to a specialist team, our fixed-price AI readiness assessment (fixed price, 5 days) covers inventory, data lineage, vendor review, and a prioritized findings list.
---
About Lets Viz: Lets Viz has delivered analytics, BI, and AI consulting since 2020 for wholesale distribution, logistics and 3PL, non-defense manufacturing, professional services, and ecommerce companies. We hold a 5.0 rating on Clutch and focus on practical, documented work that operations leaders can maintain without a dedicated data team.