How to Build Zoho Forms That Feed CRM and Creator
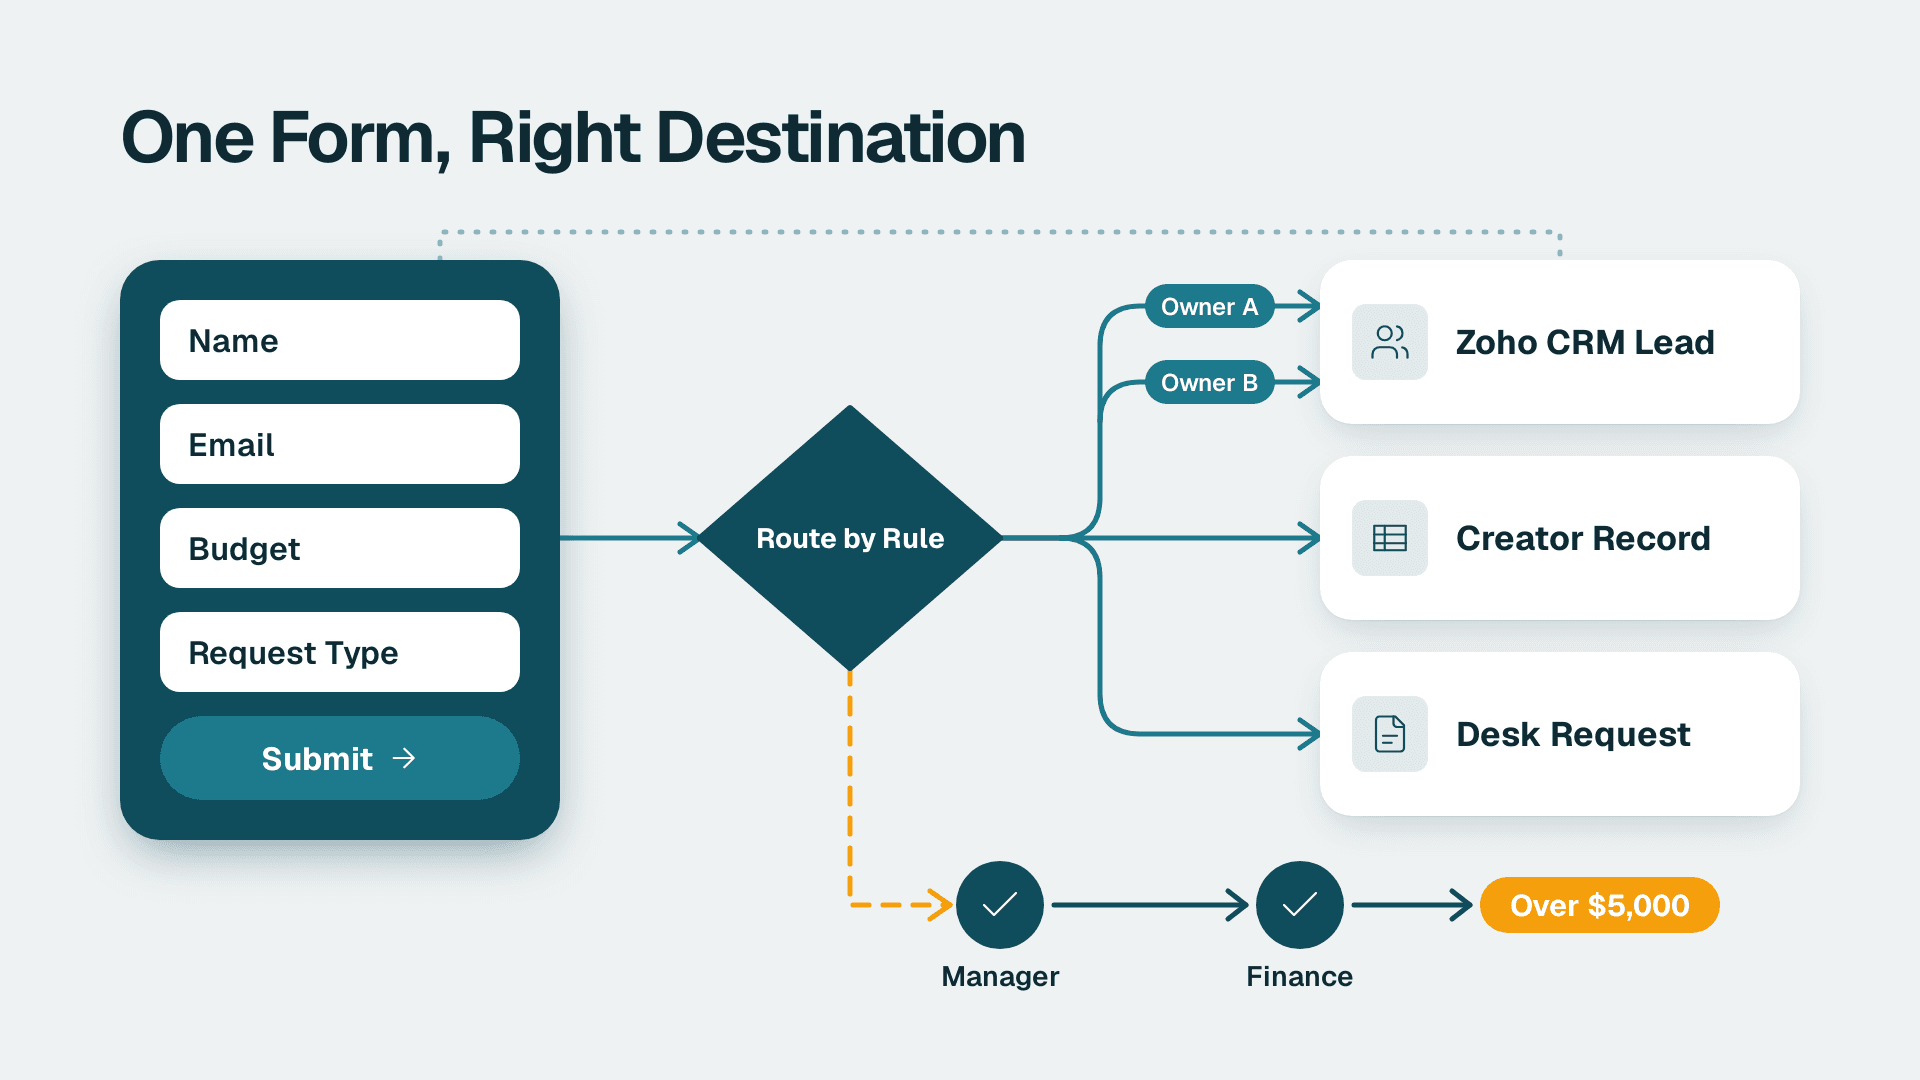
You can build a Zoho form that creates CRM leads or Creator records, routes each submission to the right owner and sends exceptions through an approval chain in roughly two to three hours. You build the form, map its fields, add routing and approval rules, then test with real submissions before sharing the link.
Key Takeaways
- One form should create one kind of record: a lead, a Desk request or a Creator record. Mixing them is the most common design mistake.
- Field mapping decides whether data lands cleanly. Spend your time there, not on form styling.
- Route in two layers: conditional logic inside the form, and assignment rules inside the destination app.
- Approvals belong on requests that cost money or change data, not on every lead.
What You'll Need
Set these up before you start, or you will stall halfway through. If you are still deciding whether the wider suite fits your business, read What Is Zoho One and Is It Worth It for Small Business? first. If you would rather have a specialist wire this for you, our Zoho consulting services cover exactly this kind of build.
| Requirement | Detail |
|---|---|
| Zoho Forms account | Admin access, signed in with the same Zoho account that owns your CRM or Creator |
| Zoho CRM | Permission to edit Leads module fields and to create assignment rules (Administrator profile) |
| Zoho Creator (optional) | Owner or developer access to the app that will receive requests |
| Zoho Desk (optional) | Admin access if form submissions should become tickets |
| A written field list | Every field you want captured, with the CRM or Creator field it maps to |
| Routing rules on paper | Who owns which type of submission, and who approves exceptions |
| Test inbox | An email address you control, for testing notifications |
Is Zoho Forms free to use?
Yes, there is a free plan. According to SoftwareFinder (last updated October 2026), paid plans run Basic at $12/month, Standard at $30/month, Professional at $60/month and Premium at $110/month, and the site notes pricing is subject to change. Which plan unlocks CRM integration, approvals and webhooks varies, so open the plan comparison inside your account and confirm those three features before you build anything you plan to depend on.
Step 1: Decide What Each Zoho Form Should Create
Before you open the builder, write down one sentence per form: 'This form creates a ___ in ___.' Zoho Forms submissions can be converted to leads in CRM, requests in Desk or contacts in Campaigns, per Zoho's integration page. Creator is the right destination when the request needs its own workflow, such as a quote request that moves through stages (see What Is Zoho Creator Used For? No-Code Apps Explained).
A workable split for a small business:
1. Contact / enquiry form creates a Lead in Zoho CRM.
2. Support request form creates a ticket in Zoho Desk.
3. Discount, purchase or custom-quote request creates a record in a Creator app and needs approval.
4. Leave or onboarding requests belong in Zoho People, covered in Zoho People: Leave, Attendance, Performance, Recruit, Payroll.
What you should see: a short list of forms, each with exactly one destination. If a form has two, split it now.
Step 2: Build the Form in Zoho Forms With Conditional Logic
This is how to build a zoho form that collects only what the destination needs.
1. Sign in to Zoho Forms and click Create Form (top right of the Dashboard).
2. Choose Start from scratch and name it clearly, for example `Website Enquiry - Lead to CRM`. The name appears in your integration list later, so make it specific.
3. In the Build tab, drag these fields in from the left panel: Name, Email, Phone, Single Line (for company), Dropdown (labelled `What do you need help with?`), and Multi Line (for the message).
4. Edit the dropdown choices to match the routing buckets you wrote down, for example `Sales enquiry`, `Support`, `Partnership`. These exact values will drive routing in Step 5.
5. Mark Name and Email as Required using each field's settings panel.
Add conditional logic
Zoho Forms offers conditional logic and custom messages that show or hide questions based on earlier answers, per Zoho's interactive forms guide. Use it to keep the form short:
- Select the dropdown, open Field Rules (or the rules option in the field's settings), and create a rule: if `What do you need help with?` is `Sales enquiry`, show `Estimated budget` and `Timeline`.
- Create a second rule: if the value is `Support`, show `Order or account number`.
What you should see: switch to Preview and pick each dropdown value. The extra questions should appear and disappear. If they do not, check that the rule points at the dropdown and not a copy of it.
Optional: start from a paper or PDF form
If you already run an intake process on paper, Zoho's PDF-to-form conversion reads an uploaded PDF, detects every field and label, and rebuilds it as an editable, mobile-friendly form, per Zoho Forms. A separate image-to-form feature does the same from a photographed paper form. Always review the converted form field by field, since the field types it guesses are not always the ones you want to map.
Step 3: Connect the Form to Zoho CRM and Map the Fields
This step is where most forms zoho integrations succeed or fail.
1. Open the form and go to its Settings tab, then choose Integrations.
2. Under Zoho Apps, select Zoho CRM and click Authorize if prompted. Use the account that owns your CRM org.
3. Choose Leads as the module and select Create Record as the action. Zoho Forms lets you push submissions to leads, contacts or other modules.
4. Map each form field to a CRM field, using the table below as a template.
| Form field | CRM field (Leads) | Note |
|---|---|---|
| Name (First) | First Name | Map the sub-fields separately |
| Name (Last) | Last Name | Required by CRM, so keep it required in the form too |
| Use for duplicate checks | ||
| Phone | Phone | |
| Company | Company | CRM requires a company on leads, so set a default value if you leave it optional |
| Dropdown: What do you need help with? | Description or a custom field `Enquiry Type` | Create the custom field in CRM first |
| Message | Description | |
| (Fixed value) | Lead Source | Set to `Website Form` so reporting stays clean |
5. Turn on duplicate handling if the integration offers it, and match on Email, so repeat enquirers update an existing record rather than creating a second one.
6. Click Save.
What you should see: the integration listed as Active under Integrations. Submit a test entry from Preview or the live link, then open CRM > Leads. A new lead should appear with the mapped values and your fixed Lead Source.
Step 4: Send Requests to Creator or Desk Instead
For requests that are not leads, repeat the pattern from Step 3 with a different destination.
To Zoho Desk
In Settings > Integrations > Zoho Apps, choose Zoho Desk, pick your department, and map Email to the contact, Message to the description and the dropdown to the ticket subject or category. The submission becomes a ticket your agents work as normal.
To Zoho Creator
If the Creator app already has a form that matches your fields, use the Creator option under the form's integrations and map fields one to one. If you do not see the option for your setup, there are two reliable fallbacks:
- Webhook: Zoho Forms webhooks push submission data to other business applications in the format the receiving system needs, per Zoho's automation page. Point it at a Creator API endpoint or custom function.
- Zoho Flow: build a flow with the form submission as the trigger and a Creator record as the action. Our guide on Zoho Flow: How to Automate Work Across Zoho and Other Apps walks through that pattern.
What you should see: after a test submission, a new row in the Creator report with every mapped field filled. Blank columns mean the mapping used a different field link name than you expected.
Step 5: Route Submissions to the Right Owner
Route in two layers. The form handles who is told. The destination app handles who owns the record.
Layer 1: notifications inside the form
1. In the form, open Settings and find the Email Notifications (or notification rules) area.
2. Create a notification for each dropdown value. For example: if `What do you need help with?` equals `Sales enquiry`, email `sales@yourcompany.com`; if it equals `Support`, email the support lead.
3. Zoho Forms can also notify by SMS and through platforms such as WhatsApp and Microsoft Teams, so use whichever channel your team actually watches.
Layer 2: assignment rules in CRM
1. In Zoho CRM, go to Setup > Automation > Assignment Rules and click Create Rule for the Leads module.
2. Add criteria that match your mapped fields, for example `Enquiry Type` is `Sales enquiry` and `Country` is a specific region.
3. Set the action to assign to a named user or round-robin among a group, then save and activate.
Keep the routing buckets few. Three or four owners is easier to maintain than a rule for every combination.
What you should see: submit one test per dropdown value. Each should email the right person and, in CRM, land on the right owner.
Step 6: Add a Multi-Level Approval Where Money or Data Is at Stake
Zoho Forms supports hierarchical or multi-level approval workflows that trigger follow-up tasks, updates and notifications on approval or rejection, according to Zoho's automation documentation. Here is a hypothetical example: a discount request form where anything above a threshold you set needs a manager and then finance to approve.
1. Build a separate form named `Discount Request`, with fields for Deal name, Requested discount % (a Number field), Reason, and Requester email.
2. In Settings, open the Approvals option under automation (the exact label can differ slightly between releases) and click Add Approval.
3. Add Level 1 and choose the approver, for example the sales manager. Add Level 2 and choose finance.
4. Add a condition so the chain only starts when `Requested discount %` is greater than your policy threshold. Below it, the request can go straight through.
5. Under the approved and rejected outcomes, set follow-up actions. On approval, create the record in CRM or Creator and notify the requester. On rejection, email the requester with the approver's comments.
6. Save and activate.
What you should see: a test submission above the threshold appears in the first approver's queue and emails them. After they approve, it moves to level 2. Only after the final approval should the destination record be created.
A useful rule: approve things that spend money, change prices or alter customer data. Do not put approvals on ordinary enquiries, or leads will sit in a queue while a competitor replies faster.
Step 7: Test, Publish and Monitor
1. Run one end-to-end test per form and per routing bucket, using a real email address you control.
2. Check three places for each test: the form's Reports tab (entry exists), the destination app (record exists with correct owner) and your test inbox (notification arrived).
3. Go to the Share tab and copy the Permalink, or use the Embed option for your website page. Zoho Forms can also be shared through QR codes and email campaigns.
4. After a week, review the Reports tab and the CRM lead list. Look for entries that never reached CRM, leads with empty fields and approvals that have been waiting too long.
5. If you want a view of response times and conversion by source, What is Zoho Analytics? explains how to chart it.
If you collect personal data, Zoho states its AI features run on its own infrastructure and that form data and generated content stay within Zoho's ecosystem and are not used to train external models. Still, record in your privacy notice what the form collects and where it goes.
Common Mistakes
- Mapping a free-text field to a CRM picklist. CRM rejects values that are not in the list, and the submission silently fails to create a record. Fix: use a dropdown in the form with identical choices, or map to a text field.
- Leaving Company or Last Name optional. CRM requires both on leads. Fix: make them required in the form or set a default value in the mapping.
- Building one form for every purpose. A single catch-all form forces long conditional logic and unclear ownership. Fix: one form per destination, as in Step 1.
- Routing in the form only. If the owner changes, you must edit every form. Fix: keep ownership in CRM assignment rules, and use the form only for notifications.
- Skipping the plan check. Some automation features depend on your plan, and add-ons are priced separately. For example, SoftwareFinder lists $2/month for 1,000 additional workflow tasks. Fix: check your plan's limits against expected monthly submissions before launch.
Troubleshooting
- Symptom: the entry appears in Zoho Forms but not in CRM. Likely cause: a required CRM field is unmapped, or a picklist value does not match. Open the integration's logs or failed-records view, read the error text and fix the mapping it names.
- Symptom: approval emails never arrive. Likely cause: the approver's address is wrong, the message went to spam, or the condition in Step 6 never evaluates true. Test with the amount set well above the threshold and check the spam folder.
- Symptom: duplicates keep appearing in CRM. Likely cause: duplicate matching is off or uses a field people vary, such as phone. Match on Email and normalise case.
If you want the whole chain built and tested for your team, our Zoho consulting services page explains how we scope and deliver that work.
---
About Lets Viz: Lets Viz is a data analytics and Zoho consulting firm, working with small and mid-sized businesses since 2020 across industries including finance, healthcare, retail and professional services. We hold a 5.0 rating on Clutch, and our team builds and maintains the CRM, Creator, Books and Desk workflows described in this guide for clients.
Sources
- Zoho Forms
- Form automation & workflows
- The Ultimate Guide to Create Interactive Forms
- Online form builder integrations
- SoftwareFinder: Zoho Forms
Facts and prices checked November 2026.