How to Set Up Zoho Sign in CRM and Creator for Contracts
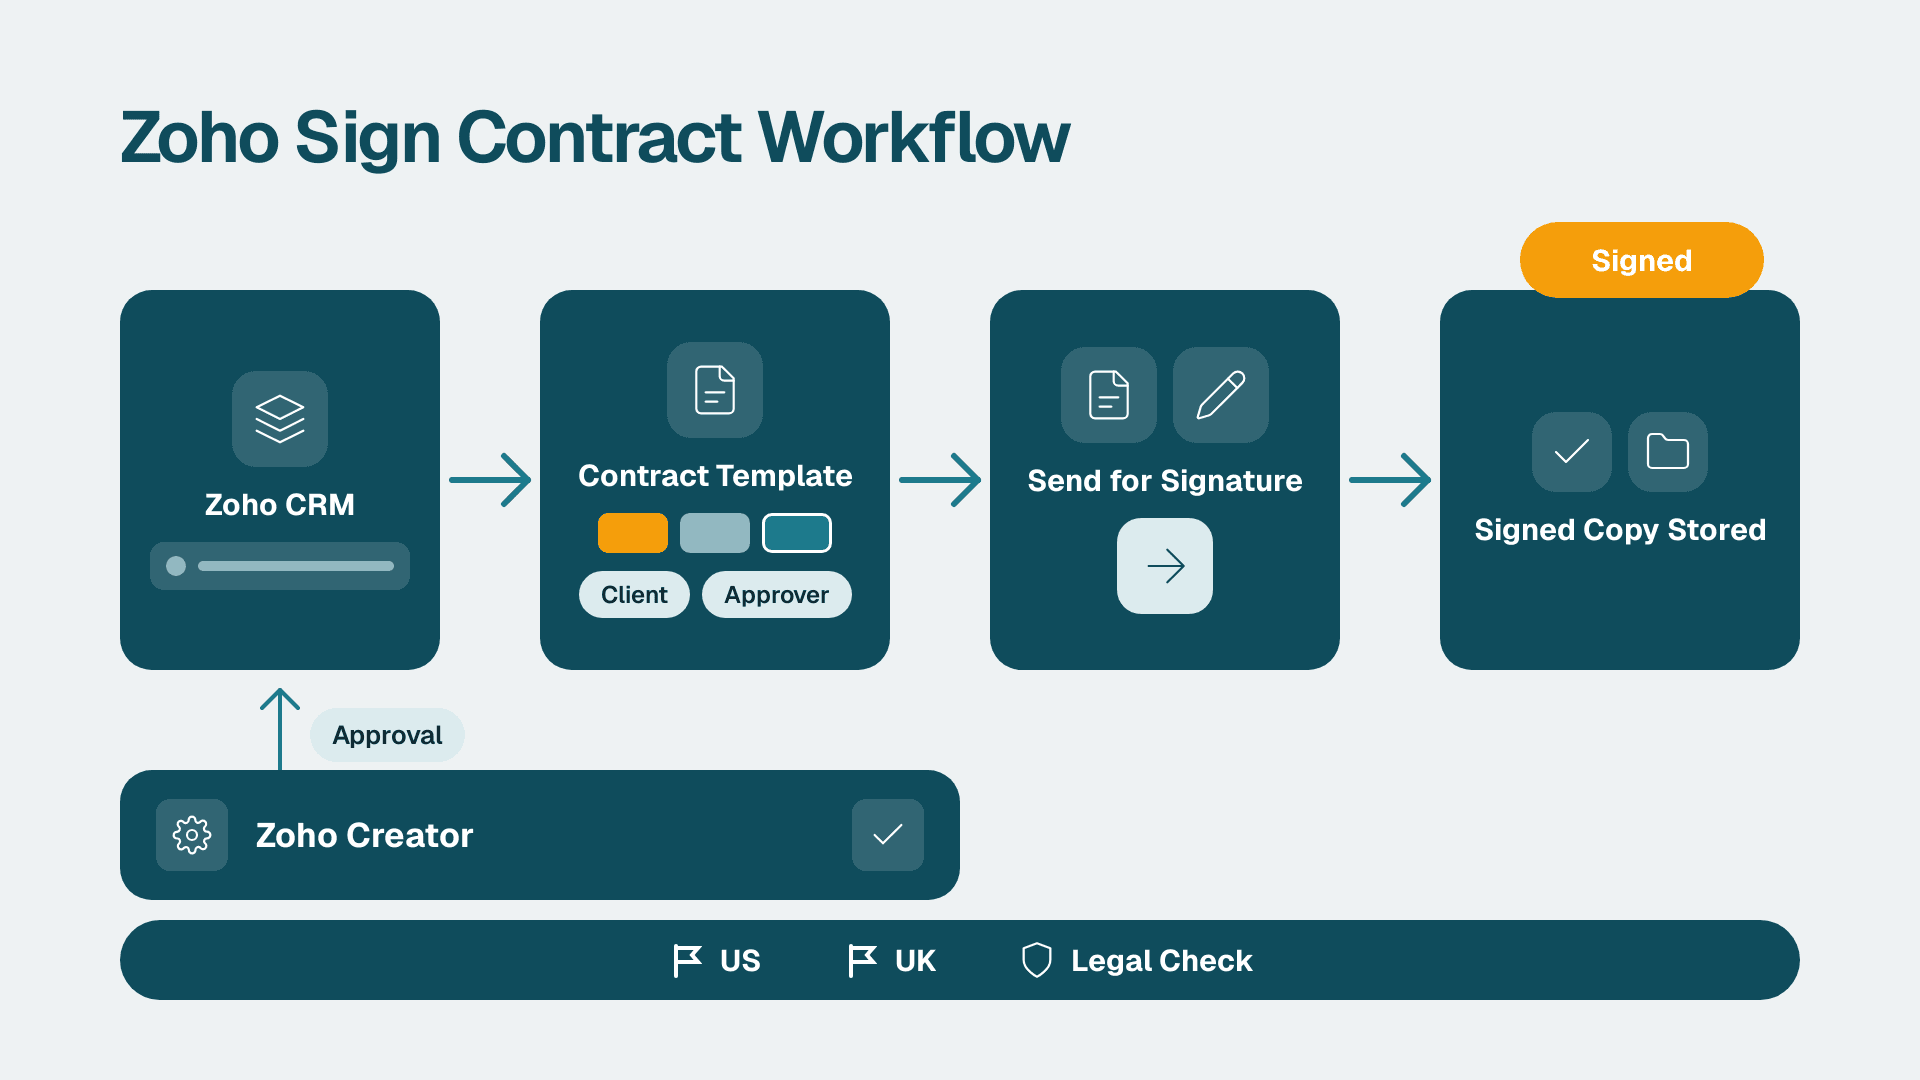
You will connect Zoho Sign to Zoho CRM and Zoho Creator, build a reusable contract template, send it for signature from a record, and store the signed copy automatically. Allow about half a day for a first working setup, plus extra time if your contracts need legal review for the US or UK.
Key Takeaways
- Zoho Sign is the e-signature service in the Zoho suite, and CRM and Creator can both trigger it from a record.
- Build one template with fixed signer roles first. Everything else in this guide depends on it.
- US and UK law both accept electronic signatures for most commercial contracts, but a short list of document types is excluded or has special rules.
- Test the full loop with your own email address before any customer sees it. If you want a specialist to configure it, see our Zoho consulting services.
What You'll Need
Have all of this ready before Step 1. Most failed setups stall on permissions, not on settings.
| Requirement | Detail |
|---|---|
| Zoho Sign account | A 14-day free trial is available on the [Zoho Sign product page](https://www.zoho.com/sign/). Use the same Zoho account email you use for CRM and Creator. |
| Zoho CRM role | Administrator profile, so you can install extensions and edit layouts. |
| Zoho Creator role | Application owner or an admin who can edit Deluge scripts in the app. |
| A contract in PDF or DOCX | Your real standard agreement, with the places where names, dates and amounts change marked. |
| Signer details | One internal signer (for example the owner) and one test external signer email you control. |
| A decision on storage | Where signed PDFs should end up: a CRM record attachment, a Creator field, or a shared drive. |
If you are still deciding whether the wider suite is worth running, read What Is Zoho One and Is It Worth It for Small Business? first. This guide assumes the decision is made.
Step 1: Start Your Zoho Sign Trial and Pick a Plan
Zoho Sign is used to send documents for signature, track who has signed, and keep an audit trail. Inside the suite, it sits behind contracts, quotes, onboarding forms and internal approvals.
1. Go to the Zoho Sign product page and select the free trial. Sign in with your existing Zoho account rather than creating a new one, so the CRM and Creator connections can find it later.
2. After sign-in you should land on the Zoho Sign home screen with a left menu that includes Inbox, Drafts, Templates and Settings.
3. Choose the plan that fits your volume. The figures below come from the Zoho Sign iOS app listing and may differ by region or change, so confirm on the pricing page before buying.
| Plan | Price in app listing | Documents |
|---|---|---|
| Free | No charge | 5 per month |
| Standard | 12 USD/month or 120 USD/year | 25 per month |
| Professional | 18 USD/month or 180 USD/year | Unlimited |
If you send fewer than five contracts a month, the Free plan is enough to prove the workflow. Anything with API-driven or high-volume sending from Creator will outgrow it quickly.
Step 2: Set Up Branding and Account Defaults
Do this before building templates so every document inherits it.
1. Open Settings in Zoho Sign and find the branding section. Zoho Sign supports custom branding for logos and emails.
2. Upload your logo and set the sender name that recipients will see in the email. Use a company name, not a personal one, so the email still makes sense when staff change.
3. Review the reminder and expiry defaults. A sensible starting point is a reminder every few days and an expiry long enough for a customer to read a contract, not a same-day deadline.
4. Send yourself a test document from Drafts to see how the branded email renders.
You should now see your logo in the signing email and on the signing page. If you see the default Zoho look, the branding was saved but not applied to that account, so check you are in the right organisation.
Step 3: Build a Reusable Contract Template
Templates are the part that makes CRM and Creator integration work. A template defines signer roles and field positions once.
1. In Zoho Sign, open Templates and choose to create a new template.
2. Upload your contract. A PDF is the safest format because layout will not shift. The iOS app listing notes support for PDF, DOCX and PNG.
3. Add signer roles, not named people. Create `Client` and `Company Signatory`. Roles let CRM and Creator fill in the real names at send time.
4. Set the signing order so the client signs first and your company countersigns second, or the reverse if your process needs it. Zoho Sign supports setting the order for multiple recipients.
5. Drag fields onto the document: signature, date signed, and text fields for anything the signer must type, such as a title.
6. Save the template with a clear name such as `Services Agreement v1`. Put the version in the name, because you will edit contracts over time.
After saving you should see the template in the Templates list with the roles you defined. Open it once more and confirm each field is assigned to the right role. A signature field assigned to the wrong role is the single most common template error.
Step 4: Connect Zoho Sign to Zoho CRM
The goal here is a button on a Deal or Contact record that sends the contract without leaving CRM.
1. In Zoho CRM, go to Setup and open Marketplace. Find the Zoho Sign extension and select Install. Menu labels shift slightly between CRM editions, so search the Marketplace for Zoho Sign if you do not see it listed under Zoho.
2. Authorise the connection when prompted, using the same Zoho account that owns the Sign trial.
3. Open a test Deal and look for a Send for Signature option, or the equivalent button the extension adds. If it is missing, go to Setup, then Customization, then Modules and Fields, open the Deals layout, and add the button to the record layout.
4. Select the button, choose your template, and map the roles. Map `Client` to the Deal's contact email and `Company Signatory` to your internal signer.
5. Send it to your test email.
You should see a document appear in the Inbox of Zoho Sign as in progress, and a signing email arrive in your test mailbox. Sign it, then check the Deal. The signed copy should be attached or linked on the record.
Automate the send in CRM
Once the manual send works, trigger it from a stage change. In CRM, create a workflow rule on Deals that fires when the stage changes to your contract stage. Keep the first version as a task to a person rather than a fully automatic send. Contracts sent with the wrong amount are worse than contracts sent an hour late. For multi-app automation beyond CRM, Zoho Flow can chain Sign with other tools.
Step 5: Connect Zoho Sign to Zoho Creator for Approvals
Creator is where contracts and internal approvals live when your process does not fit CRM, such as vendor onboarding, purchase approvals or HR forms. If Creator is new to you, What Is Zoho Creator Used For? covers the basics.
1. Open your Creator application and go to Workflows. Create a workflow on your form, for example `Vendor Agreement`, that runs on a Successful form submission or on an approval status change.
2. In the Deluge script editor, look in the integration tasks list for Zoho Sign. Creator exposes Sign actions you can call from a script, including creating a document from a template and sending it. Use the editor's own task list to get the exact syntax for your version, rather than copying scripts from old forum posts.
3. Supply the template name or ID, the signer role names from Step 3, and the signer email taken from a form field.
4. Add a status field to the form with values such as `Draft`, `Sent for Signature`, `Signed`. Update it from the script when you send.
5. Submit a test record using your own email.
You should see the document appear in Zoho Sign and the Creator record status change to `Sent for Signature`. If you need to build entirely custom flows, Zoho Sign also provides REST APIs to automate signing from your own apps or websites.
Step 6: Store the Signed Document and Close the Loop
Sending is half the job. Someone has to know when the contract is signed and where the file lives.
1. Decide on one storage location per document type. Do not store the same contract in three places.
2. In CRM, use a workflow or Zoho Flow to update the Deal stage when Sign reports completion, and attach the signed PDF to the record.
3. In Creator, update the `Status` field to `Signed` and store the signed file in a File upload field.
4. If you also generate documents in Zoho Writer, its built-in signing supports post-sign workflows where the signed document can be stored, sent, or used to invoke a function. Details are on the Zoho Writer signing page.
5. Notify the owner. A short internal email or task, saying which contract was signed and by whom, closes the loop.
After a test signature, confirm three things: the status updated, the PDF is attached, and the notification arrived. If any of those is missing, fix it now. Silent failures here mean you will not notice a stuck contract for weeks.
Step 7: Check Legal Validity for the US and UK
This section is practical guidance, not legal advice. Have a solicitor or attorney confirm anything high-value or unusual.
United States
The federal ESIGN Act and the state-level UETA (adopted in most states) give electronic signatures the same legal effect as handwritten ones for most commercial contracts, provided the parties intended to sign electronically and the records can be retained. Zoho states that Zoho Sign complies with the ESIGN Act and UETA, and that its audit trail records timestamps, the signer's email address, device IP and completion details. Keep that audit certificate with the contract.
Certain document types are commonly excluded, including wills and some family-law and court documents, so check before using e-signature for those.
United Kingdom
UK law generally accepts electronic signatures for commercial contracts. Simple e-signatures work for most business agreements. Deeds, which need a witness, and certain property transactions carry extra formalities, so treat those as separate cases. Where you need stronger proof of identity, Zoho describes qualified electronic signatures that use qualified digital certificates from a qualified trust service provider after verifying the signer's identity. Zoho also separates an e-signature (a digital image of a handwritten signature) from a digital signature, which uses cryptography and a certificate to prove identity. Decide which level your contract risk justifies.
Identity checks and records
For higher-risk contracts, enable signer identity verification. The iOS app listing mentions dynamic KBA (knowledge-based authentication). Zoho also states data is encrypted in transit with SSL/TLS and at rest with AES 256-bit encryption. Whatever you choose, record in your contract policy which document types use which level of verification.
Step 8: Run an End-to-End Test Before Going Live
1. Create a test Deal in CRM and a test record in Creator, each with your own email as the client.
2. Send both contracts. Open the signing email on a phone as well as a desktop, since many clients sign on mobile.
3. Sign as the client, then as the company signatory.
4. Confirm status changes, attachments and notifications for both paths.
5. Recall one test document mid-process and confirm the recipient can no longer sign it.
6. Delete the test records so reports stay clean.
Write down the result in a one-page runbook: which template, which button, who owns failures. That page is what keeps the setup working after the person who built it moves on.
Common Mistakes
- Using named signers in the template. The template then sends to the same person every time. Use roles such as `Client` and map them at send time.
- Wrong role on a field. A signature box assigned to `Company Signatory` appears on the client's screen as nothing, or blocks completion. Open the template and check every field's role.
- Mismatched Zoho accounts. Installing the CRM extension under a different login than the Sign account produces an empty template list. Reauthorise with the account that owns Sign.
- Editing a live template. Changing the contract text in place alters future sends without a record. Save a new version, such as `Services Agreement v2`, and retire the old one.
- Skipping the audit trail. Storing only the signed PDF and not the completion certificate weakens your position if a signature is disputed. Save both.
Troubleshooting
- The Send for Signature button does not appear on CRM records. The extension is installed but not added to the module layout, or the user's profile lacks permission. Add the button in the layout editor and check the profile.
- Signers say the email never arrived. The message is usually in spam, or the email on the record has a typo. Resend from Zoho Sign after correcting the address, and ask clients to allow your sender domain.
- Creator sends but the status never changes to Signed. The script updates status on send only, with nothing handling completion. Add a completion step through a Sign callback or a Flow, then test again.
What Does Zoho Sign Cost, and Is It Trustworthy?
Using the plan figures in Step 1, small teams can start free and move to a paid plan as volume grows. On trust, Zoho publishes its ESIGN Act, UETA, GDPR and HIPAA compliance claims and its encryption approach. Treat these as vendor statements and verify them against your own regulatory needs, particularly for health data or UK and EU processing.
The tool is the easy part. Process design, such as who approves what and where records live, is where most teams need help. If you want a second pair of hands, our Zoho consulting services cover exactly this kind of setup across CRM, Creator, Books and Desk.
Sources
Facts and prices checked November 2026.
---
About Lets Viz: Lets Viz has delivered analytics, automation and Zoho consulting since 2020 for small and mid-sized businesses across finance, healthcare, retail, logistics and professional services. We hold a 5.0 Clutch rating, and our Zoho work focuses on practical setups that teams can run without us.