How to Migrate a Power BI Workspace to Microsoft Fabric
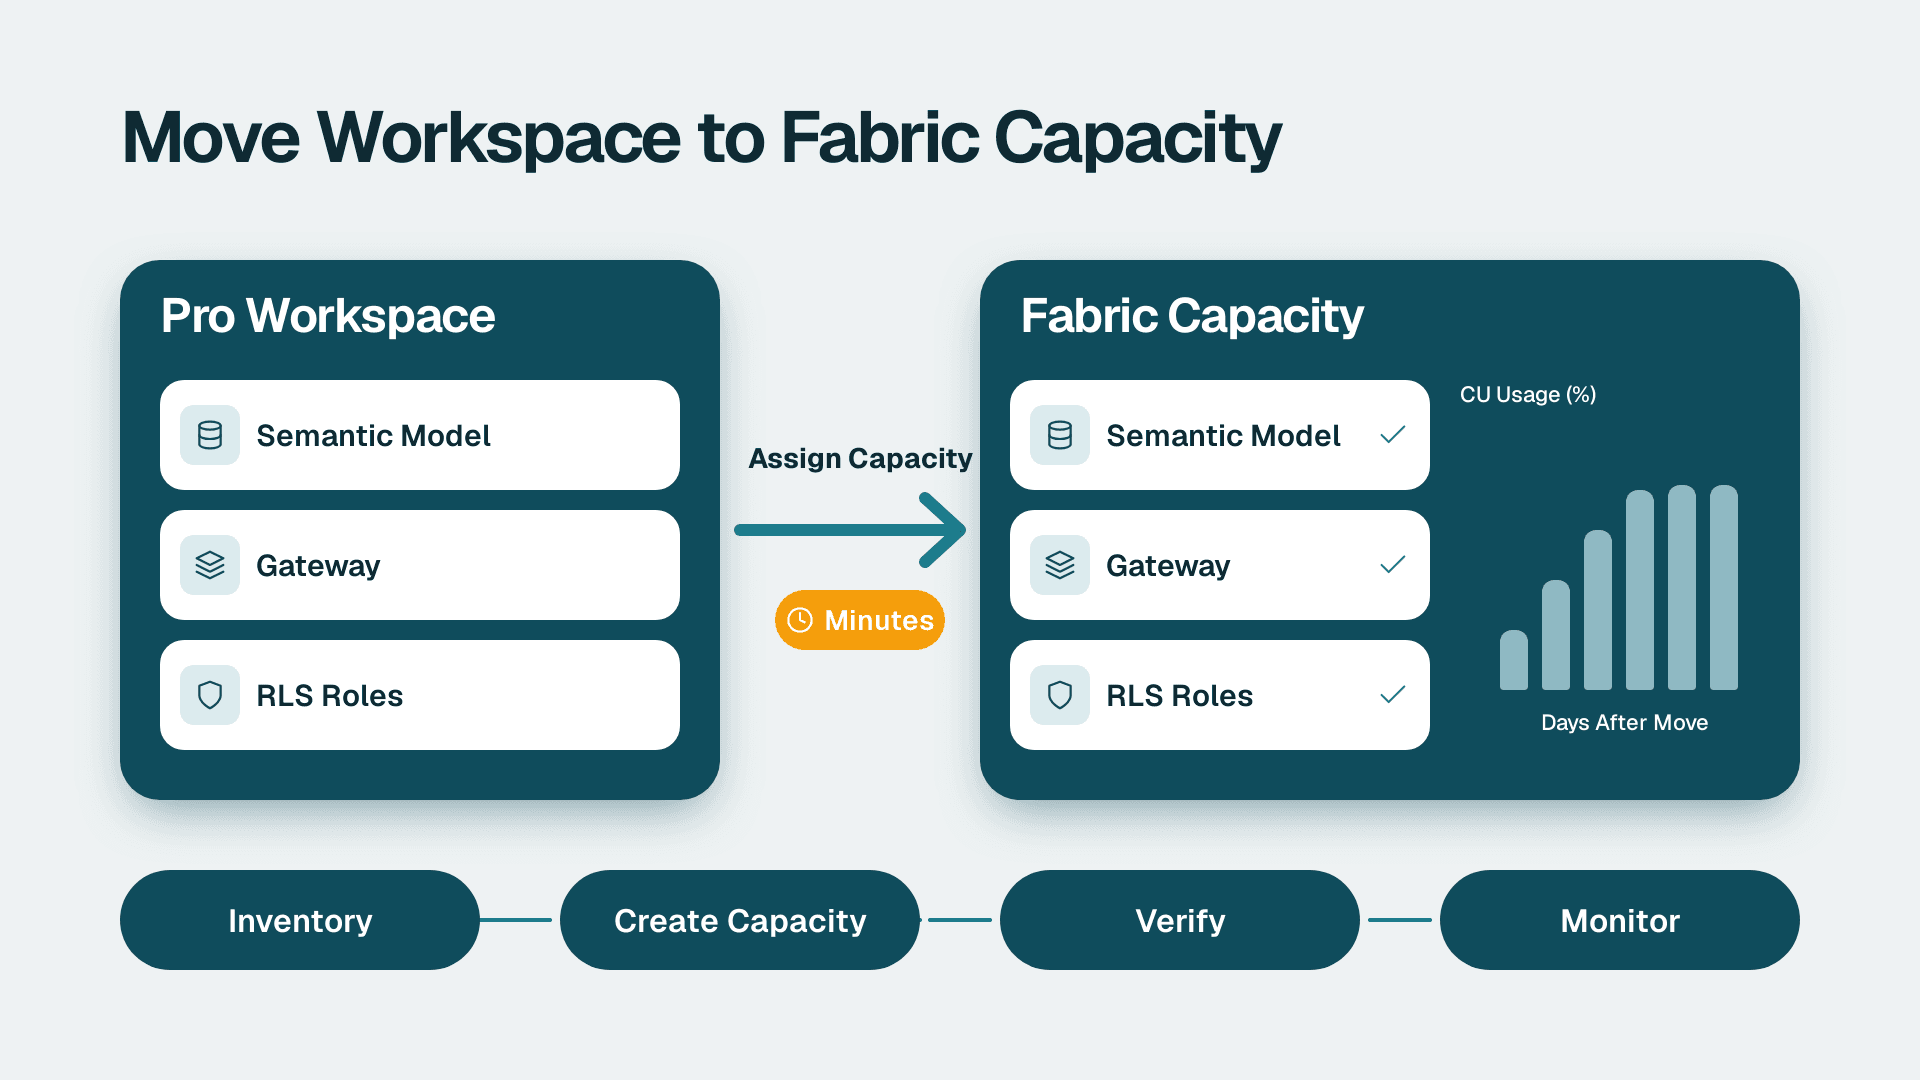
You will move a Power BI workspace from Pro, Premium Per User or Premium capacity onto a Fabric capacity, then confirm that semantic models, on-premises gateway refreshes and row-level security (RLS) still behave. A typical workspace takes one to three working days, mostly for testing. The licence switch itself takes minutes.
What You'll Need
- Fabric capacity admin rights on the target capacity, plus Workspace Admin on every workspace you will move.
- Fabric administrator (or Power BI administrator) role to read tenant settings in the Admin portal.
- An Azure subscription where you can create a Microsoft Fabric capacity resource (you need Contributor or Owner on the resource group).
- A list of every workspace, semantic model, dataflow and report you plan to move. Export it from the Admin portal under Workspaces.
- The name of the Azure region required by your residency policy (for example, an EU region for GDPR commitments, or a Canadian region for PIPEDA-driven customer expectations).
- Gateway admin access to each on-premises data gateway cluster that your models use.
- A test user for every RLS role, so you can verify role filtering after the move.
- Current licence prices for the plan: Power BI Pro is $14 per user/month and Premium Per User is $24 per user/month (list prices since 1 April 2025). Fabric capacity is billed per capacity SKU, so check the current Azure price for your region.
If you want a map of how the pieces fit together before you start, read our Microsoft Fabric architecture guide for finance reporting.
Step 1: Inventory Workspaces and Record Their Current Licence Mode
Start with facts about what you have. Guessing here is the most common reason a migration stalls halfway.
1. Open the Power BI service, click the gear icon, and choose Admin portal.
2. Select Workspaces. Add the columns for License mode, Capacity name and State.
3. Export the list and sort by licence mode. You will see values such as Pro, Premium per user and Premium capacity.
You should now have a spreadsheet with one row per workspace. Add three columns of your own: Region requirement, Gateway used (Y/N) and RLS used (Y/N). Fill them in by opening each workspace's Settings and the dataset Security page. Anything marked Y in the last two columns gets extra testing in Steps 6 and 7.
Decide the order
Move a low-risk internal workspace first. Leave anything with executive audiences or regulated data until you have a repeatable checklist.
Step 2: Create the Fabric Capacity in the Right Region
The capacity region is the single setting that determines where your data is processed and stored at rest for that capacity. Choose it once and carefully.
1. Sign in to the Azure portal and search for Microsoft Fabric.
2. Click Create. Select your subscription and resource group.
3. Set Capacity name (lowercase letters and digits only), then pick the Region that satisfies your residency requirement.
4. Choose the Size (the F SKU). For a first migration, size to the busiest workspace's refresh and query load, then adjust after Step 8. A smaller SKU is easy to scale up later.
5. Add at least two Capacity administrators, then click Review + create and Create.
You should see the resource listed in Azure with a status of Active. Back in the Power BI service, open Admin portal > Capacity settings > Fabric capacity and confirm your new capacity appears in the list.
Understand on-demand billing before you pick a SKU
Fabric capacities bought through Azure are pay-as-you-go: you can pause the capacity when idle and resume it when needed, and billing stops while paused. Pausing also means reports and refreshes on every attached workspace stop working, so do not pause a capacity that serves production users. A reserved commitment is cheaper per hour but removes that flexibility. Treat on-demand as the right default for a pilot and revisit once usage is stable.
Step 3: Check Tenant Settings and Data Residency Controls
Before assigning anything, confirm the tenant allows what you are about to do.
1. In Admin portal, open Tenant settings.
2. Under Microsoft Fabric, check Users can create Fabric items. Scope it to a security group if you do not want every user creating lakehouses.
3. Under Export and sharing settings, review Guest users can access Microsoft Fabric and Allow shareable links so they match your data-sharing policy.
4. Under Admin portal > Capacity settings, open your new capacity and review Delegate tenant settings if you want capacity-level overrides.
EU data residency and PIPEDA
Your tenant has a home region, set when the tenant was created. Fabric capacities can be created in other regions (Microsoft calls this Multi-Geo), and the data for items in a workspace stays in the capacity's region. Check Microsoft's current Fabric documentation on data residency and Multi-Geo for any item types or features that process data outside the capacity region, such as some Copilot and cross-region features.
For GDPR, put EU personal data on a capacity in an EU region and document it in your records of processing. PIPEDA is different: it does not mandate that Canadian data stay in Canada, but it holds your organisation accountable for personal information wherever it is processed, and it expects you to be transparent with individuals about transfers. In practice, many Canadian mid-market teams still choose a Canadian region to keep that conversation simple. Whichever law applies, write down the chosen region and the reason. Our guide to Microsoft Fabric data governance for HIPAA, GDPR and PIPEDA covers the controls in more depth.
You should end this step with a short written note: tenant home region, capacity region, and the rule that justifies it.
Step 4: Assign the Workspace to Fabric Capacity
This is the actual migration. It is fast and reversible, which is why the testing steps matter more than the switch.
1. Open the workspace in the Power BI service and click Workspace settings (the gear or ellipsis at the top right).
2. Select License info.
3. Under License mode, choose Fabric capacity (or Premium capacity if you are assigning to an existing P SKU).
4. In the Select a capacity drop-down, pick your new capacity and click Save.
The workspace header should now show a diamond or Fabric icon, and License info should list your capacity name. The workspace gains access to Fabric items such as lakehouses, warehouses and notebooks.
What changes for viewers
- On a Fabric capacity of F64 or larger, report viewers do not need individual Pro licences to consume content shared with them. Below F64, viewers still need a Pro or PPU licence, so check the SKU against your audience size before you drop licences.
- Content creators and anyone publishing to the workspace still need a Pro or PPU licence for authoring.
- A workspace that was on PPU can only be used by PPU-licensed users. After the move, that restriction goes away, so confirm that sharing and Build permissions on each dataset are still what you intended.
If the workspace is in a different region
Moving a workspace between capacities in different regions is limited. Power BI-only content is generally more flexible than workspaces containing Fabric items, and some moves require recreating items. Check Microsoft's documentation on moving workspaces across regions first. If it is blocked, create a new workspace on the target capacity and republish the content, then update app audiences and links.
Step 5: Verify Semantic Models and Storage Format
Semantic models keep their definitions, measures and relationships when the workspace moves. What can change is how they refresh and how large they can grow.
1. Open the workspace and click Settings on each semantic model (the three dots, then Settings).
2. Expand Large semantic model storage format. If the model is large, set the toggle to On and click Apply. Capacity SKUs set the memory limit per model, so a model that fit under Pro limits may behave differently under a small F SKU.
3. Expand Refresh and note Last refresh and the Scheduled refresh time zone and times.
4. Click Refresh now, then open Refresh history from the workspace list.
You should see a refresh with status Completed. If you run many scheduled refreshes at the same minute, stagger them, since refreshes on a capacity compete for the same compute. Our guide to setting up a Power BI data refresh schedule without breaking reports explains how to space them.
Quick model hygiene while you are here
Capacity-based billing makes inefficient models visible, because they consume capacity units that other workloads need. Replace `LOOKUPVALUE` calls that exist only to pull a column from another table with a proper relationship and `RELATED`. Relationships are evaluated by the engine's optimised join path, while repeated `LOOKUPVALUE` calls scan a table for each row. Similarly, review iterator-heavy measures; our piece on SUMX versus SUM shows when the iterator is worth the cost.
Step 6: Re-test On-Premises Gateway Connections
Gateways are tenant-level, not workspace-level. An on-premises data gateway does not need to be reinstalled when a workspace moves to Fabric capacity, and the dataset-to-gateway binding normally survives. Verify it anyway.
1. In the Power BI service, click the gear icon and choose Manage connections and gateways.
2. Select the On-premises data gateways tab. Confirm each cluster shows Online.
3. Open the semantic model Settings and expand Gateway and cloud connections.
4. For each data source, confirm the Maps to drop-down shows your gateway connection and not Personal Cloud Connection. If it is blank, select the connection and click Apply.
5. Click Refresh now and wait for the refresh to finish.
You should see the data source row marked as connected and a successful refresh in history. If you plan to use Dataflows Gen2 or pipelines in Fabric against on-premises sources, those also rely on the gateway, so test one of each item type before you declare the workspace done.
One practical point for residency: a gateway runs in your network, so it is the data leaving your network toward the capacity region that matters. Confirm that gateway traffic is going to the capacity region you chose in Step 2 and not to an unintended region.
Step 7: Validate RLS Roles and Membership
RLS rules are stored in the semantic model, so they move with it. What you must verify is that role membership and the way the model is queried still produce the right rows.
1. In the workspace, open the semantic model's three-dot menu and choose Security.
2. Select each role in turn. Confirm the member list (users or Microsoft Entra security groups) matches your records.
3. Click the three dots next to a role and choose Test as role. Pick a test user, then open a report and check the visible rows against what that user should see.
4. Repeat for a user who belongs to two roles. Power BI combines roles with a union, so overlapping roles show more data, not less.
You should see only the filtered rows, and a user with no role membership should see no data at all in the report.
Direct Lake and RLS
If you later convert a model to Direct Lake to use OneLake data, be aware that RLS defined on the semantic model means queries can fall back to DirectQuery against the SQL analytics endpoint, which can change performance. Check Microsoft's current Direct Lake documentation before you promise latency targets. Keep Import mode for models that rely heavily on semantic-model RLS until you have tested the fallback behaviour.
Step 8: Monitor Capacity Usage After the Move
The first week on a new capacity tells you whether you sized it correctly.
1. In the Power BI service, open Apps > Get apps and install the Microsoft Fabric Capacity Metrics app (a capacity admin must do this).
2. Open the app and select your capacity from the Capacity Name drop-down.
3. On the Compute page, read the Utilization chart. Look for sustained peaks and any Overage or throttling indicators.
4. Use the Items table to sort by capacity units and identify the semantic models or refreshes that consume the most.
5. Open Admin portal > Capacity settings and set up Notifications so capacity admins get an email when utilisation crosses a threshold you choose.
You should see a daily pattern that lines up with your refresh schedule and report usage. If utilisation sits low, scale down. If it spikes into throttling, move heavy refreshes off-peak before you buy a bigger SKU. If you want Copilot, note that it needs a paid Fabric capacity F2 or higher, or Power BI Premium P1 or higher; Pro or PPU alone is not enough, and trial capacities are excluded. Our Power BI Copilot readiness checklist lists what else to prepare.
For audit evidence, remember that Microsoft Purview Audit (Standard) keeps audit logs for 180 days. Export capacity assignment events if your regulator expects a longer record.
Common Mistakes
- Choosing the capacity region last. Fix: decide the region in Step 2 from your residency note. A wrong region can force you to republish content into a new workspace.
- Removing Pro licences from viewers on a capacity smaller than F64. Fix: check the SKU size before licence changes. Below F64, viewers still need Pro or PPU to open shared content.
- Pausing the capacity to save money while users depend on it. Fix: pause only non-production capacities, or schedule pause windows outside business hours and refresh times.
- Assuming RLS tests passed because the report loads. Fix: use Test as role for each role and each overlapping-role user, and test with an account that has no role.
- Scheduling all refreshes at the top of the hour. Fix: stagger start times by at least a few minutes and review the Capacity Metrics app after the first week.
Troubleshooting
- The capacity does not appear in the License info drop-down. Likely cause: you are not listed as a capacity admin or contributor for it, or the capacity is paused. Check Capacity settings and confirm the state is active.
- Scheduled refresh fails with a credentials or gateway error after the move. Likely cause: the data source mapping reverted to a personal cloud connection or the gateway cluster is offline. Re-map it under Gateway and cloud connections and confirm the cluster shows Online.
- Reports are slow or show a capacity-exceeded message. Likely cause: the SKU is too small for concurrent refreshes and queries. Read the Utilization chart in the Capacity Metrics app, then stagger refreshes or scale the SKU.
If this migration touches several workspaces and regions, our team can run it with you. See our Power BI and Fabric consulting to scope the work, or start with the free BI readiness assessment.
---
About Lets Viz: Lets Viz is a data analytics consultancy that has delivered Power BI, Microsoft Fabric and data platform projects since 2020 for healthcare, finance, distribution and professional services clients. We hold a 5.0 Clutch rating, and our practitioners plan every Fabric migration around residency, governance and capacity cost from day one.