How to Create Custom Modules in Zoho CRM: 7 Steps
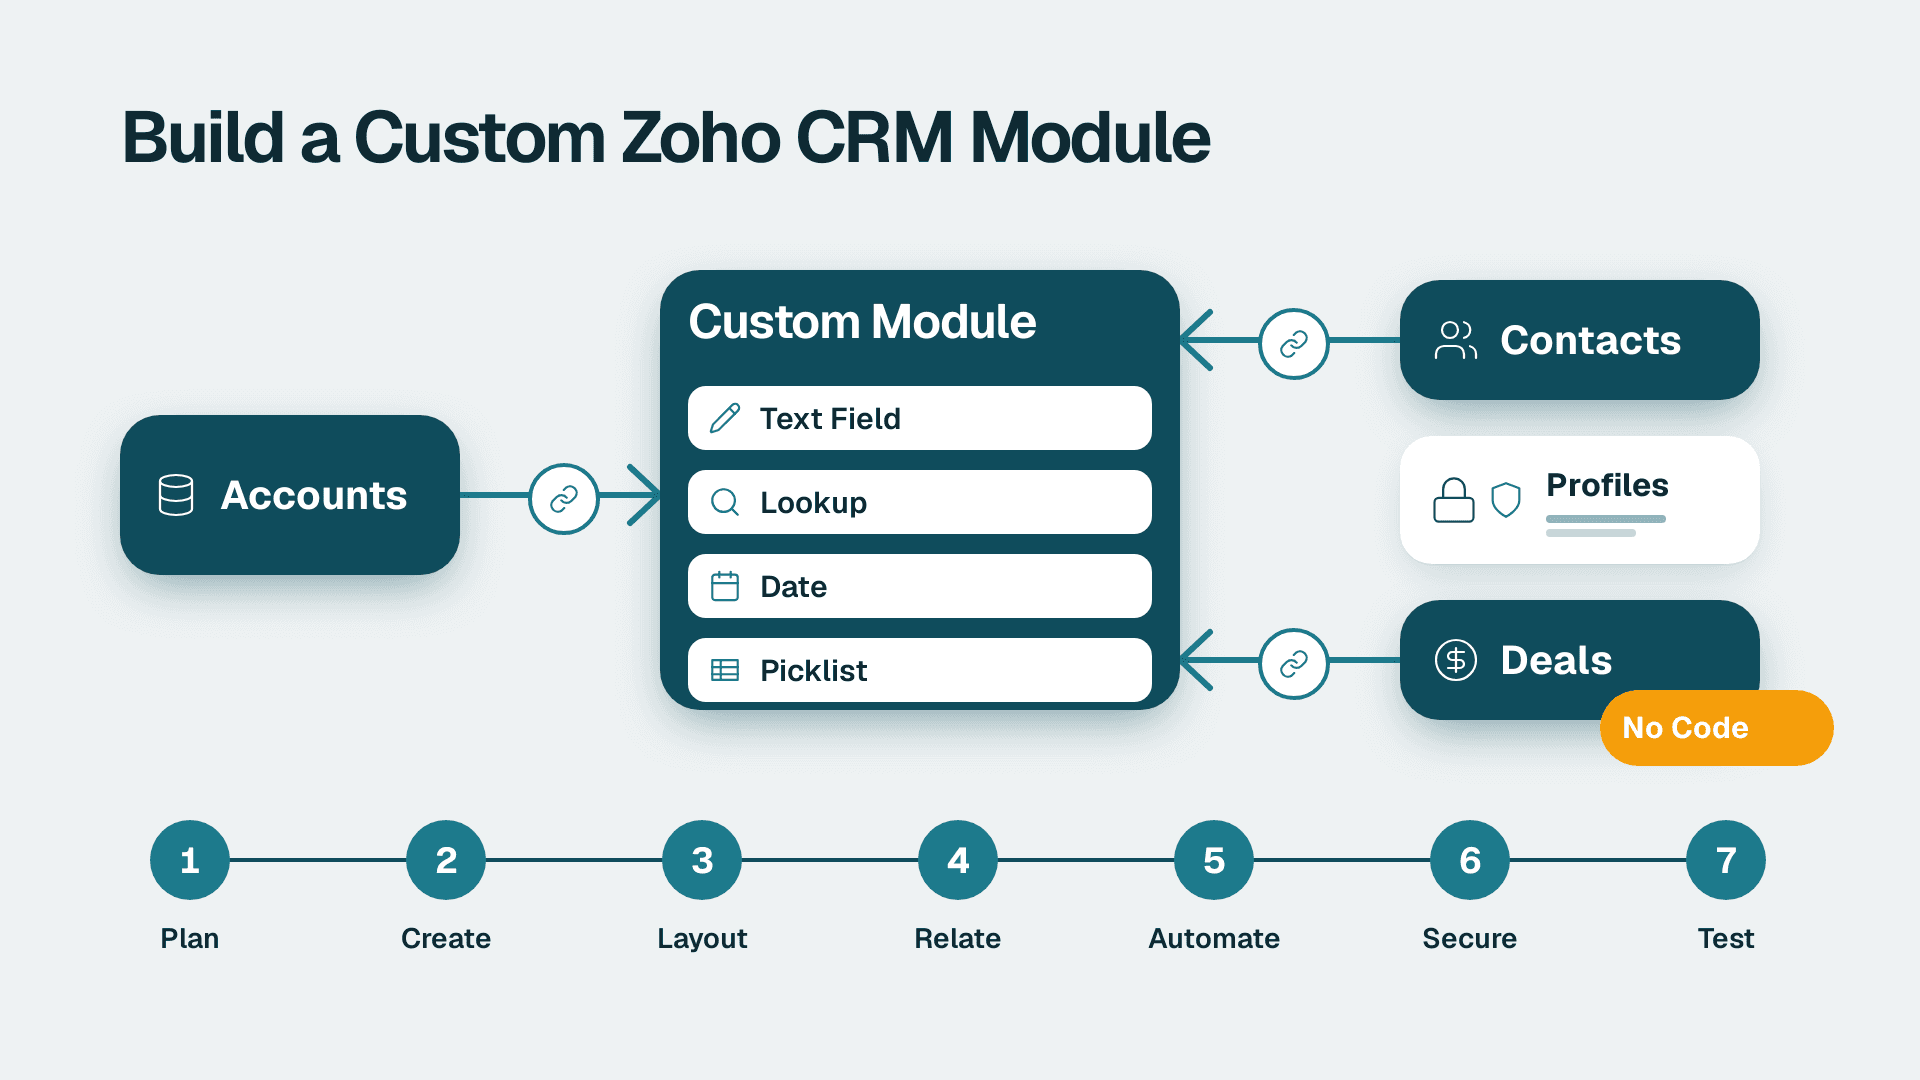
You will build a working custom module in Zoho CRM, connect it to Accounts, Contacts and Deals, and restrict who can see it. A first module realistically takes two to three hours including testing, plus extra time if you need to import existing records. Everything below is done from Setup, with no code.
What You'll Need
- A Zoho CRM edition that allows custom modules. The number of custom modules you can create varies by edition, so check your edition's limits in Zoho's current pricing and feature comparison before you plan a build.
- Administrator profile access. Only users on the Administrator profile (or a profile with the relevant Setup permissions) can see Setup > Customization.
- A one-page design for the module. List the thing you are tracking, the 8 to 15 fields you need, which existing records it belongs to, and who may see it.
- A sandbox or a quiet hour. If your edition includes a sandbox, build there first. If not, build while few people are working, and keep the new module hidden from other profiles until you finish.
- Sample data. Five to ten real records in a spreadsheet so you can test the module properly.
If you are still deciding whether a custom module is the right tool, the guide on Zoho apps businesses underuse is a useful companion, because some needs are better met by a separate app.
Step 1: Decide Whether You Need a Module or Just Fields
Before you click anything, test your idea against this rule: create a module only if the thing has its own life cycle, many records per customer, and its own owner.
Good candidates for B2B service firms in the US, UK and Canada:
- Projects or Engagements: one account has many, each with a start date, a status and a lead.
- Contracts and Renewals: many per account, each with a term, value and renewal date.
- Assets or Licences: each with a serial number, a vendor and an expiry.
- Statements of Work: several per deal, each with scope and billing milestones.
- Compliance Reviews: per client, recurring, with an auditor assigned.
Bad candidates: anything that is a single attribute of an existing record. A client's preferred language is a field on Accounts. A client's twelve open engagements are a module.
Write down, for your module: the singular name, the plural name, the parent record (usually Accounts) and the record name field (what you will see in lists, for example "Engagement Name").
You are done with this step when you can state in one sentence what one record in the module represents.
Step 2: Create the Module
1. Click the gear icon, then open Setup.
2. Under Customization, click Modules and Fields.
3. Click Create New Module (in some interface versions this sits behind a + or New Module button at the top of the module list).
4. Choose the option for a custom module built from scratch rather than a template.
5. Enter the Singular Name (for example, "Engagement") and the Plural Name ("Engagements").
6. Click Create.
What you should see: the new module appears in the module list with a default layout, and a field called Name (or your module's equivalent) already exists as the record title. In Zoho's current interface you may land in the layout builder straight away. That is expected.
Rename the title field now if you want something clearer, such as Engagement Name. Do that from the layout editor by clicking the field's settings icon and choosing Edit Properties.
If the module does not appear in the top navigation yet, that is normal. You will deal with visibility in Step 6.
Step 3: Build the Layout with Fields and Sections
Open Setup > Customization > Modules and Fields, click your new module, then click Layouts and edit the Standard layout.
Add sections first
Drag a New Section from the left panel and name it. A clean engagement layout might use:
- Engagement Overview: name, type, status, owner
- Dates and Value: start date, end date, contract value, currency
- Delivery: lead consultant, hours budget, next milestone
- Notes: description
Add fields
Drag each field type from the left panel into a section, then use the settings icon to name it and mark it Required where appropriate. These are the types you will use most:
- Pick List for status values. Enter the values exactly as you want them reported, for example `Proposed`, `Active`, `On Hold`, `Closed`.
- Currency for contract value. Set the decimal places in the field properties.
- Date for start and end dates.
- User for the lead consultant, so ownership reports work.
- Number or Decimal for budgeted hours.
- Email for any address you may want to email from CRM.
What you should see: each dragged field appears in the layout with the label you typed. Click Save and Close only when every field has the right type, because changing a field's type later is restricted once data exists.
Use the standard Email field for addresses
This is a lesson from real client work. A client's supplier mass-mail kept reporting "No emails have been sent." Zoho mass email only sends to the standard Email field, and their addresses lived in a custom field called Primary_Email. We backfilled the standard field, coverage went from 77 of 358 to 283 of 358, and the resend delivered 206 of 206. If any record in your module will ever be emailed, use the Email field type and keep addresses there.
Step 4: Relate the Module to Accounts, Contacts and Deals
A module on its own is a spreadsheet. The value arrives when it connects to the records your team already works in.
1. In the layout editor, drag a Lookup field into the Engagement Overview section.
2. In the field's properties, choose the module it points to: Accounts.
3. Label it Account and mark it Required, so no engagement exists without a client.
4. Repeat for Contacts (label it Primary Contact) and, if relevant, Deals (label it Source Deal).
5. Click Save.
What you should see: when you open any Account record, a related list called Engagements (or your plural name) now appears lower on the page. If it does not, open the Accounts layout, check the Related Lists panel on the left, and drag your module in.
Pick the direction carefully
A lookup is a many-to-one link. Many engagements point to one account. That is almost always what you want. If you genuinely need many-to-many, such as engagements involving several accounts, use a Multi-Select Lookup field instead, which gives you a linking relationship in both directions. Use it sparingly, because reports on many-to-many data are harder to build.
Optional: carry values from the parent
If the Account holds a region, add a matching field on the module and fill it with a workflow rule (Step 5). That keeps reporting by region simple without retyping.
If you routinely work with territory data, the same logic applies. In one multi-region B2B engagement, the Country field was empty for all 19,643 contacts and Mailing Country was filled on only 2.3%. Region was populated on 64%, so we built a fallback chain, Region first and then email domain, and contacts now route to the right country list automatically. The lesson for your module: decide which field is the source of truth before you build reports on it.
Step 5: Add Validation and Automation
A module that relies on people remembering rules will drift within weeks. Add three small automations.
Create a workflow rule for status changes
1. Go to Setup > Automation > Workflow Rules and click Create Rule.
2. For Module, choose your custom module. Name the rule "Engagement closed - notify owner".
3. For When, choose On a record action and then Create or Edit.
4. Set the condition: Status is Closed.
5. Add an instant action: Email Notification to the record owner, or a Task to complete a closing checklist.
6. Click Save.
Add a renewal reminder
Create a second rule that is Date or Time Based on the End Date field. Trigger it 30 days before, and send a task to the owner. This is the most common reason B2B firms create a Contracts module in the first place.
Use field validation where available
Open the field's properties and set minimums, required flags or unique values where the field type supports them. For example, mark an Engagement ID text field as unique so duplicates are rejected.
What you should see: edit a test record to Closed, and within a minute the email or task appears. If nothing fires, check the rule is Active in the Workflow Rules list.
Step 6: Secure the Module with Profiles and Sharing
This is where most custom modules get built wrongly. Two separate systems control access, and you need both.
Set profile permissions
1. Go to Setup > Users and Control > Security Control > Profiles.
2. Click a profile, for example Standard, then click Edit.
3. Scroll to Module Level Permissions and find your new module.
4. Tick only the actions that profile needs: View, Create, Edit, Delete.
5. Check Export and Import behaviour in the same screen, because bulk data leaves CRM through those.
6. Click Save.
Repeat for every profile. New modules often start with no access for non-admin profiles, which is why users say they "cannot see" the module.
Set record-level sharing
1. Go to Setup > Users and Control > Security Control > Sharing Permissions.
2. Find your module in the list and click Edit (or Set Default Permissions, depending on your interface).
3. Choose Private, Public Read Only or Public Read/Write/Delete.
4. Click Save.
For contract values or compliance material, choose Private. Users then see only their own records and those of people below them in the role hierarchy. Open Roles under the same menu to confirm the hierarchy matches your reporting lines.
Restrict sensitive fields
In the profile's Field Level Permissions (also called field permissions), set contract value or audit notes to Read Only or Don't Show for profiles that should not see them. If your clients fall under UK GDPR or Canada's PIPEDA, treat this as part of your data-minimisation work, not an extra.
What you should see: log in as a test user, or use Setup > Users to preview with a restricted profile, and confirm that the module appears for allowed users and is absent for everyone else.
Step 7: Add Views, Import Data and Test End to End
Create useful list views
Open the module from the top navigation. Click the Filter or Custom View control and save views such as My Active Engagements and Ending in 60 Days. Pin your favourites so the team starts from a clean list.
Import existing records
1. Open your module and click the Actions menu (three dots), then Import.
2. Upload a CSV or XLSX file whose first row contains headers.
3. Map each column to a CRM field on the mapping screen.
4. For the Account lookup, make sure the spreadsheet contains the exact account name or ID, or the lookup will import blank.
5. Run the import with five to ten rows first.
If your data lives in old spreadsheets or a legacy database, the guides on migrating from Excel to Zoho Analytics and migrating an Access database to Zoho Creator cover the clean-up work that should come before any import.
Run an end-to-end test
Do all of the following with a test account:
- Create an engagement from the Account's related list and confirm the Account lookup fills itself in.
- Change the status to Closed and confirm the workflow fires.
- Search for the record from the global search bar.
- Open a restricted user's view and confirm field and record access.
Only after every check passes should you announce the module to the team.
Common Mistakes
- Using a custom text field where a standard field exists. Email addresses in a custom field cannot be used for mass email, as the Primary_Email case above shows. Fix: move values into the standard Email field and keep custom fields for genuinely new data.
- Making status a free-text field. Reports then show "Active", "active" and "Actve" as three groups. Fix: use a Pick List and set the values before anyone enters data.
- Forgetting the lookup is optional. Records get created with no Account, and they vanish from account views. Fix: mark the Account lookup Required in the layout.
- Securing only the profile. A profile with View access plus a Public Read/Write/Delete sharing default exposes every record to everyone with that profile. Fix: set the sharing default to Private and open it up through roles.
- Building before sketching. Changing a field type after records exist is restricted, and renaming pick list values later requires a replacement step. Fix: complete the one-page design in Step 1 first.
Troubleshooting
- The module does not show in the top navigation. The cause is usually profile permissions or a hidden tab. Check Module Level Permissions for that profile, and check the tab or navigation settings under Setup > Customization > Modules and Fields to confirm the module is visible.
- The related list is missing on the Account page. The lookup field was saved, but the Accounts layout has not been told to show the related list. Edit the Accounts layout and drag the module in from the Related Lists panel.
- Imported records show a blank Account. The spreadsheet value did not match any existing account exactly, often because of trailing spaces or differing legal names. Correct the names, or import with the account ID, and run the import again with a small batch.
Where to Go from Here
Once the first module is stable, reuse the same pattern for the next one: design, fields, lookups, automation, security, test. Resist the urge to build six modules at once. Each one adds reporting, permissions and training overhead, so add them as real processes demand them.
If you want a second pair of hands on the design, our team can review the structure before you build. Book a scoping call through Zoho CRM consulting and we will map your engagement, contract or asset process onto a module design, relationships and permission model.
---
About Lets Viz: Lets Viz is a data analytics and Zoho consulting firm that has served clients since 2020 across healthcare, finance, logistics, SaaS and professional services in the US, UK and Canada. We hold a 5.0 rating on Clutch, and our work covers Zoho CRM design, Power BI, Microsoft Fabric and automation for small and mid-sized teams.