Changing Column Names Dynamically in Power Query

Hey there! In this post, I want to show you a neat trick—how to rename column headers dynamically in Power Query.
Sometimes, you might find yourself in a situation where you don’t want hardcoded column names. Instead, you want the headers to change based on what the user inputs. That’s exactly what we’ll tackle today.
Sample Data
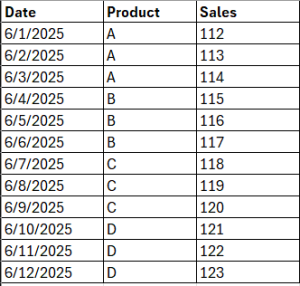
We’ve got some sample data, and alongside that, there’s a table where users can define what the new column names should be. Using this, we’ll let users rename the existing headers however they like.
Alright, let’s load both of these tables into Power Query and get started!
Renaming Column Headers in Power Query
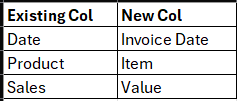
Alright, for now, I’m just going to rename the columns the manual by double-clicking on the column headers and typing in the new names. So, here’s what I’ll change:
- Date becomes Invoice Date
- Product becomes Item
- Sales becomes Value
As soon as you do that, Power Query adds a new step called “Renamed Columns” in the Applied Steps pane. Let’s take a closer look at what’s going on behind the scenes.
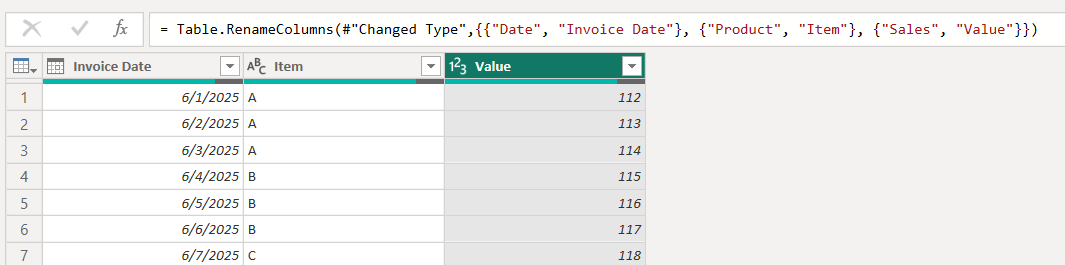
= Table.RenameColumns(#"Changed Type",{{"Date", "Invoice Date"}, {"Product", "Item"}, {"Sales", "Value"}})
You’ll notice that the formula generated is using Table.RenameColumns, and it takes two inputs:
- The table you’re working with—in this case, it’s #“Changed Type”
- A list that defines which columns to rename and what to rename them to.
This list is written in curly brackets and looks something like this:
{{“Date”, “Invoice Date”}, {“Product”, “Item”}, {“Sales”, “Value”}}
Here’s the breakdown:
- Each pair of old and new column names is wrapped in its own set of curly brackets.
- All those pairs are then wrapped in a larger set of curly brackets to form a single list.
So what’s the goal? Right now, those column names are hardcoded—but we want to make them dynamic, so they can be updated based on user input.
And just in case you’re wondering—a list in Power Query is essentially a single column of values, and you’ll always see it written inside curly brackets {}.
Building a Dynamic Column Name List
Alright, let’s jump over to the table that holds both the existing column names and the new ones we want to use.
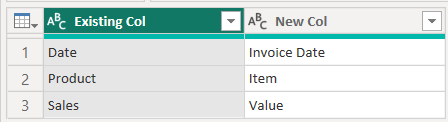
Everything looks fine so far—but there are two small issues we need to fix:
- Right now, we have two separate columns: one for the existing names and one for the new names. But what we need is a single list, not two columns.
- Also, the data is still in a table format, but what we really need is a list of sub-lists—each sub-list holding a pair like { “Existing Name”, “New Name” }.
To get this sorted, let’s use the Transpose step in Power Query. Once we do that, you’ll notice we now have rows that each contain a pair—exactly what we need!
But hold on—we’re not quite there yet. Even though it looks like a list of pairs, it’s still not in list format.

No worries—we’ll take care of that by heading over to the Advanced Editor (under the View tab) and making a few small tweaks to our query.

CreateList = Table.ToColumns(#'Transposed Table')

Creating Dynamic Column Names
Now comes the fun part—we’re going to plug our dynamic headers right into the Table.RenameColumns formula.
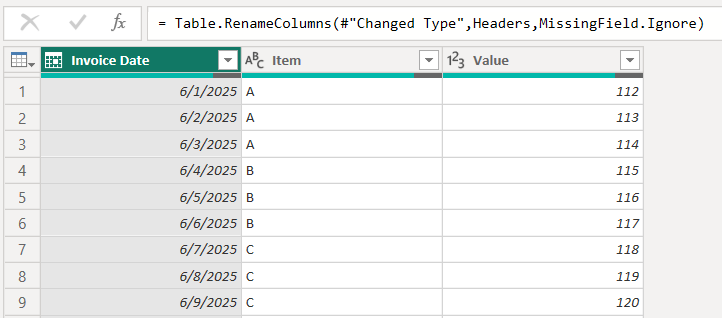
The Headers here is just the name of the query we transformed earlier—it contains the list of old and new column names in the format we need.
We’ll also add MissingField.Ignore as the third argument. This handy option tells Power Query to quietly ignore any columns that aren’t being renamed, instead of throwing an error. Super useful!
And that’s it, we’re done!
Now, anytime a user updates the column names in the table, the query will automatically pick up the changes and rename the columns accordingly.
As you can see, business intelligence has a lot to offer businesses of all sizes across all industries. If you’re not already using BI in your decision-making process, now is the time to start!
For more customizable options, feel free to avail our Power BI Consulting Services and explore tailored solutions to meet your specific needs.
Check out other helpful Power BI Blogs
- What are the different types of Data Analysis?
- Choosing the Right BI tool – Follow these major guidelines
- Mastering Financial Statements in Power BI: A Step-by-Step Guide
- Complete Financial Modeling Guide for Microsoft Power BI
- Financial Dashboard Examples for Better Decision-Making
- How to Format a Power BI visualization
- Build a Calculated field using DAX in Power BI
- Job Roles and Responsibilities in Power Bi

If you are looking forward to getting your data pipeline built and setting up the dashboard for business intelligence, book a call now from here.
#analytics #data #business #artificialintelligence #machinelearning #startup #deeplearning #deeplearning #datascience #ai #growth #dataanalytics #india #datascientist #powerbi #dataanalysis #businessanalytics #businessanalyst #businessandmanagement #dataanalyst #businessanalysis #analyst #analysis #powerbideveloper #powerbidesktop #letsviz