How to add Row Level Security in Power BI


What Is Row Level Security in Power BI?
Power BI’s row-level security allows administrators to control who has access to what data. Access to data may be regulated at the row level by applying filters, and these filters can be defined inside roles. It is important to remember that under the Power BI service, all members of a workspace have access to all the datasets in that workspace. When using RLS, you will not encounter any access restrictions to these records.
Why Row Level Security is needed in Power BI Report?
In Power BI, ensuring data security and controlling user-specific access is crucial when working with shared reports or dashboards. This is especially critical when handling sensitive data or when different users should only access information relevant to their roles, departments, or regions.
Row-Level Security (RLS) provides a solution by allowing report creators to restrict access to data at a granular level. By defining rules within RLS, you can:
- Protect Sensitive Data: Limit data visibility to authorized users, reducing the chances of unauthorized access or data leaks.
- Create Personalized Views: Deliver customized data views tailored to each user’s responsibilities, such as roles, teams, or geographic areas, enhancing the relevance of the reports.
- Ensure Compliance: Maintain adherence to regulatory and organizational data access policies, which is especially important in sectors like healthcare, finance, and government.
This blog will explore the significance of Row-Level Security in Power BI, how it operates, and provide a comprehensive guide to implementing it effectively in your reports.
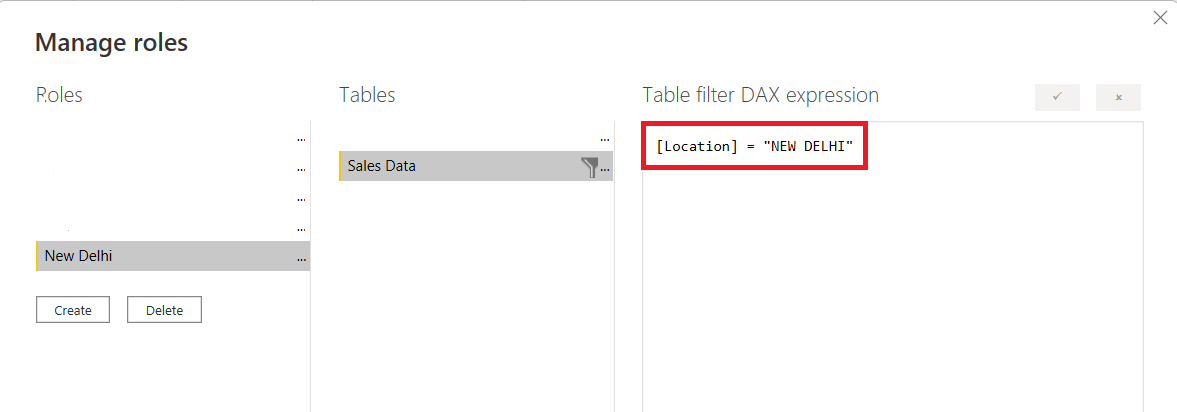
In Power BI Desktop, define roles and rules.
Within the Power BI Desktop, roles and rules may be set. The job definitions are also published when you publish to Power BI. It is a crucial component of Power BI’s Row Level Security. These procedures should be followed to establish security roles.
- Import data or set up a DirectQuery connection in your Power BI Desktop report.
For Analysis Services live connections, Power BI Desktop does not support role definition. Within the Analysis Services model, you must accomplish that.
- The Modeling tab should be chosen.
- Choose Manage Roles.

- Choose Create.
- Give the position a name.
- Decide the table you wish to use for the DAX rule.
- Enter the DAX expressions, The result of this expression should be true or false. as in [Entity ID] = “Value”.
Note: This expression is compatible with the username() function. Be careful that on the Power BI Desktop, the username() has the format of DOMAIN username. It takes the form of the user’s User Principal Name inside the Power BI service and Power BI Report Server (UPN). As an alternative, you may use userprincipalname(), which consistently returns the user in the format of username@Lets-viz.com for their user principal name.
- After creating the DAX expression, you may verify it by checking the box next to the expression box.
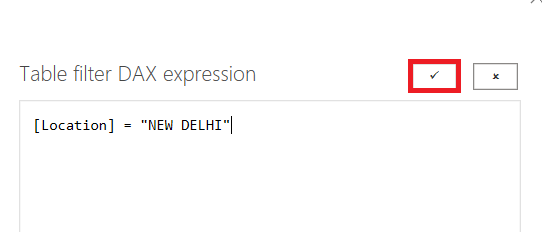
Note: Even if you’re using a locale that typically employs semicolon separators, you must use commas to separate DAX function parameters in this expression box.
- Choose Save.
Users cannot be added to a role in Power BI Desktop. Within the Power BI service, you allocate them. By using the username() or userprincipalname() DAX methods and configuring the appropriate relationships, you may enable dynamic security in Power BI Desktop.
Whether the relationships are set to single-direction or bi-directional, row-level security filtering by default use single-directional filters. Select the relationship, then check the box next to Apply security filter in both ways to manually activate bi-directional cross-filter with row-level security. If you’ve additionally implemented dynamic row-level security at the server level, where row-level security is dependent on the user name or login ID, you should choose this checkbox.
Check the roles in Power BI Desktop.
Test the outcomes of the roles in Power BI Desktop once you’ve established them.
1. Choose View As Roles.

The roles you’ve established are visible under View as roles.
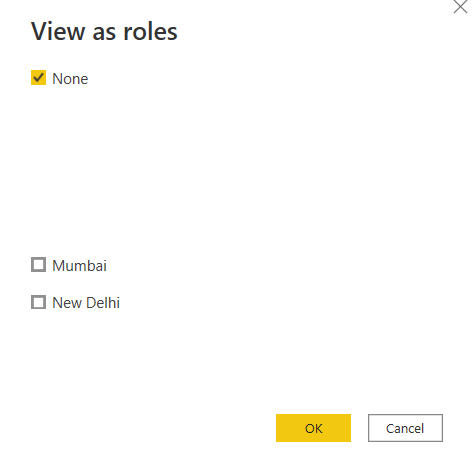
- To apply a role you created, choose it and click OK. The report makes the information pertinent for that position.
- Another option is to choose Other user and enter a specific user. The User Principal Name (UPN), which is what the Power BI service and Power BI Report Server utilise, is the ideal thing to enter.
- After selecting OK, the report is rendered according to what the user can see.
Only if you’re utilising dynamic security determined by your DAX expressions will Other users in Power BI Desktop show you different results.
Manage your model’s security
The following are the steps you should take to handle security on your data model.
- For a dataset, choose the ellipse (…).
- Choose Security.
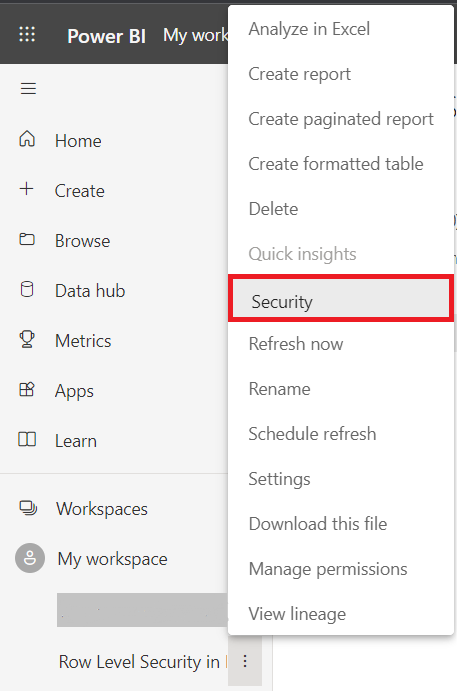
By doing so, you will be sent to the RLS page where you may add individuals to a role you’ve defined in Power BI Desktop. Only the dataset’s owners will be able to access Security. Only the group’s administrators will be able to view the security option if the dataset is part of the group.
Roles may only be modified or created in Power BI Desktop.
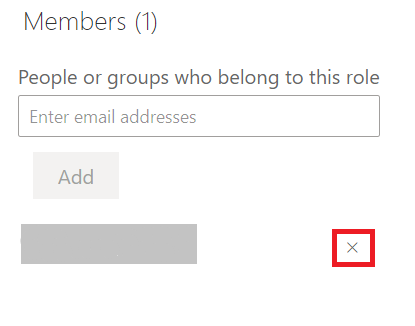
Employing Members
Adding Members
By entering the email address or name of the user, security group, or distribution list you want to add, you may add a member to the role. Power BI-created Groups cannot be added. Members from outside your organization may be added.
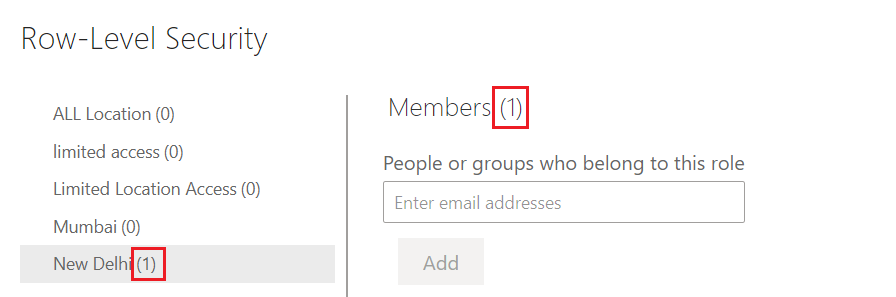
The number in parentheses next to the role name or next to Members indicates how many members are a part of the position.
Remove members
Selecting the X next to a member’s name will remove them from the list.
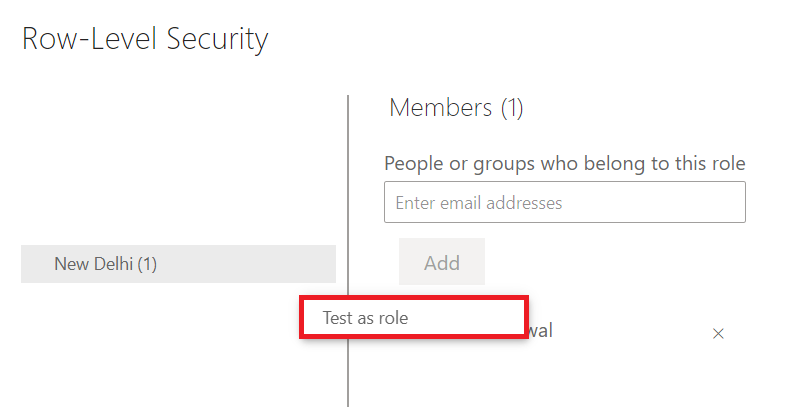
Verifying the Position On the Power BI service’s website
By testing the role, you can confirm that it is functioning as intended.
- Click the (…) next to the job.
- Choose “Test data” as the role
The reports that are accessible for this job will then appear. The view does not include dashboards. You can see what is applied in the blue bar above.
By choosing “Now viewing as,” you may experiment with different roles or combinations of roles.
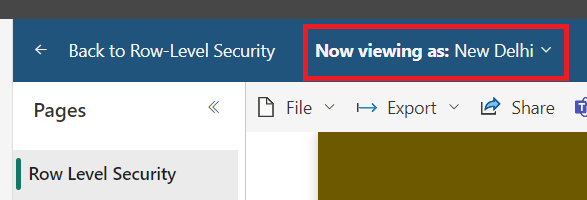
To confirm that they are functioning, you may choose a mix of the possible roles or decide to see the data as a particular individual.
Select Back to Row-Level Security to resume regular viewing.
Using the DAX functions username() or userprincipalname()
In your dataset You may use the DAX functions username() or userprincipalname() in your dataset. They may be used in Power BI Desktop expressions. Your model will be utilised by the Power BI service after you publish it.
In Power BI Desktop, the functions username() and userprincipalname() will produce users with the DOMAINUser and user@Lets-viz.com formats, respectively.
Both username() and userprincipalname() in the Power BI service will yield the user’s User Principal Name (UPN). This resembles an email address in appearance.

As you can see, business intelligence has a lot to offer businesses of all sizes across all industries. If you’re not already using BI in your decision-making process, now is the time to start!
For more customizable options, feel free to reach out to our Power BI Consulting Company and explore tailored solutions to meet your specific needs.
Check out other helpful Power BI Blogs

If you are looking forward to getting your data pipeline built and setting up the dashboard for business intelligence, book a call now from here.
#analytics #data #business #artificialintelligence #machinelearning #startup #deeplearning #deeplearning #datascience #ai #growth #dataanalytics #india #datascientist #powerbi #dataanalysis #businessanalytics #businessanalyst #businessandmanagement #dataanalyst #businessanalysis #analyst #analysis #powerbideveloper #powerbidesktop #letsviz